Crime Scene Cleaner Secrets & Tape Locations

Being a big fan of games like Powerwash Simulator, as well as a love of the morbid (horror movies, TV shows like CSI, etc), I knew Crime Scene Cleaner would be a game that ticks quite a few boxes for me; and with it being on Xbox Game Pass Ultimate right now, it just felt right.
It doesn’t take too long to complete, though some levels are definitely a bit more of a slog than others, so I thought I’d write a handy little guide for all of the Secrets and Tapes, so you can make sure not to miss any. Some of the tapes are titled slightly differently in the ‘Mission Complete’ screen compared to what shows when you pick them up, so I’ll also note these differences here, to prevent any confusion along the way.
Additionally, some Achievements/Trophies are tied to doing specific things within each level, so I’ll make a point of noting these for you all, too. A few I should probably mention here:
The first since it involves every level in the game… and that is ‘Down by the River’, which you will get once you have flushed a toilet in every mission - so just make a point to flush the first loo you see when you start each level to avoid any unnecessary backtracking.
Popping 30 balloons (across all levels) will gain you ‘Fight For Your Right (To Party)’.
Destroying 30 items (such as wine bottles, glasses, vases, etc) will unlock the ‘What I’ve Done’ Achievement.
Petting your dog, Dexter, will unlock ‘Who Let The Dogs Out’; whilst petting him 30 times will gain you ‘Happy Together’.
Playing a Cassette for the first time will unlock ‘Bitter Sweet Symphony’; this can be done from within the same menu as the Codex, just hit the RB to switch screen and pick a tune!
Stealing a cumulative $50,000 worth of stuff will gain you the ‘Money, Money, Money’ Achievement.
Throwing a Toaster in your bathtub in your Apartment (later in the game once more renovations have been done) will get you the ‘Electric Feel’ Achievement. Can also keep an eye out for a toaster within missions, and chuck one in a bathtub there if you find one.
‘Oops, I Did It Again’ will be unlocked after the 15th tip of the bucket. I did not even need to try for this one as it is so goddamn easy to knock the bucket over.
Picking up a cumulative 100 pieces of trash from around the levels will get you the ‘Supermassive Black Hole’ Achievement.
The ‘Smooth Operator’ Achievement requires completing a level without breaking anything, nor creating any new blood stains. Easiest way to get this one is to replay the first level after you’ve upgraded everything (as some upgrades stop your mop and sponges from leaving bloody marks once dirty, and another stops you from tracking blood anywhere you step). Technically you could get this just through being careful, but safe to say I’m too clumsy for that!
If you have any questions, feel free to give me a message!
Mission 1: Bad Call
- Secrets: 3/3 - Tapes: 3/3 -
Secret 1: When you first enter the apartment building, go up the stairs and you will see an open window with flowers and a book titled ‘Secrets Nearby’ on the ledge. Climb out the window and shimmy along to the left onto the nearby roof to find a little table and chairs set up for what seems like a somewhat romantic date.

Cleaning your first blood stain will get you the ‘This Is How We Do It’ Achievement.
Secret 2/Tape 1: Go up into Apartment 23, and you’ll notice that you can access a balcony through the window that has been boarded up. Break the boards and climb through onto the balcony.
Breaking the boards gains you the ‘Bóbr k*rw@!’ Achievement; unsure how many required, but there are a few boards throughout this level if you need more.
From the balcony, you can see an outside lift - carefully walk along the edge of the wall along to this, and then activate the lift with the green button to drop it down to the lower level, next to a window into a new apartment. Climb through this window into a tiny little apartment space/shrine to uncover the next Secret; here you’ll also find the a Tape on the shelf to the right, titled “Epitaph of a Good Friend”.


Also from the balcony, you can drop the escape ladder and go down to gain access to the courtyard area, as well as a locked room that you will need two ‘Lucky Keys’ to access. One can be found in the apartment below Apartment 23 (accessible by going down to the lower level of the Balcony), and the other in the courtyard, right where you leave the ladder.
Through the door with a spray-painted love heart, you’ll find a Basketball Court where you can shoot hoops - get the ball into the basket to unlock the ‘Basket Case’ Achievement.
Secret 3/Tape 2: Once you have both Lucky Keys, head to the end of the courtyard area to find a locked gate with a four leaf clover above. Strangely, there seems to be some kind of bug with this area on Xbox, where going closer to the gate makes vents pop in, almost blocking the way into the gate. You’ll just need to go over to the side to get in if this occurs for you. Enter this area and walk round to the back and open another locked gate to find the next Secret, as well as the next Tape: “Cieszyn’s Venice”, sitting on top of a heater.
Also sitting on top of the same heater to the left of the Tape is a block of ‘Miraculous Fertilizer’ which once collected will gain you the ‘Strawberry Fields Forever’ achievement.


Tape 3: Finally, the last Tape can be found near the end of the level. Once you’ve gone up into the Attic, the “Classical Music Collection” Tape is right there for you to grab.


Now that you’ve grabbed all of the Tapes and found all of the Secrets, your Mission Complete screen should show everything as found (highlighted in blue). Sadly, the Mission Select screen only shows Tapes and not Secrets, so it can be easy to not realise you’ve missed a Secret unless you actually replay a level later and view this screen again.
Completing the level will get you the ‘Dirty Deeds Done Dirt Cheap’ Achievement; completing it with a Perfect Score will also gain you ‘Bad Call’.

Mission 2: Trial by Blood
- Secrets: 2/2 - Tapes: 3/3 -
First things first, when the level begins you will receive a call from your new boss, Big Jim. To unlock the ‘Call Me Maybe’ achievement, do not interact with the walkie-talkie. You can restart the level after this is done.
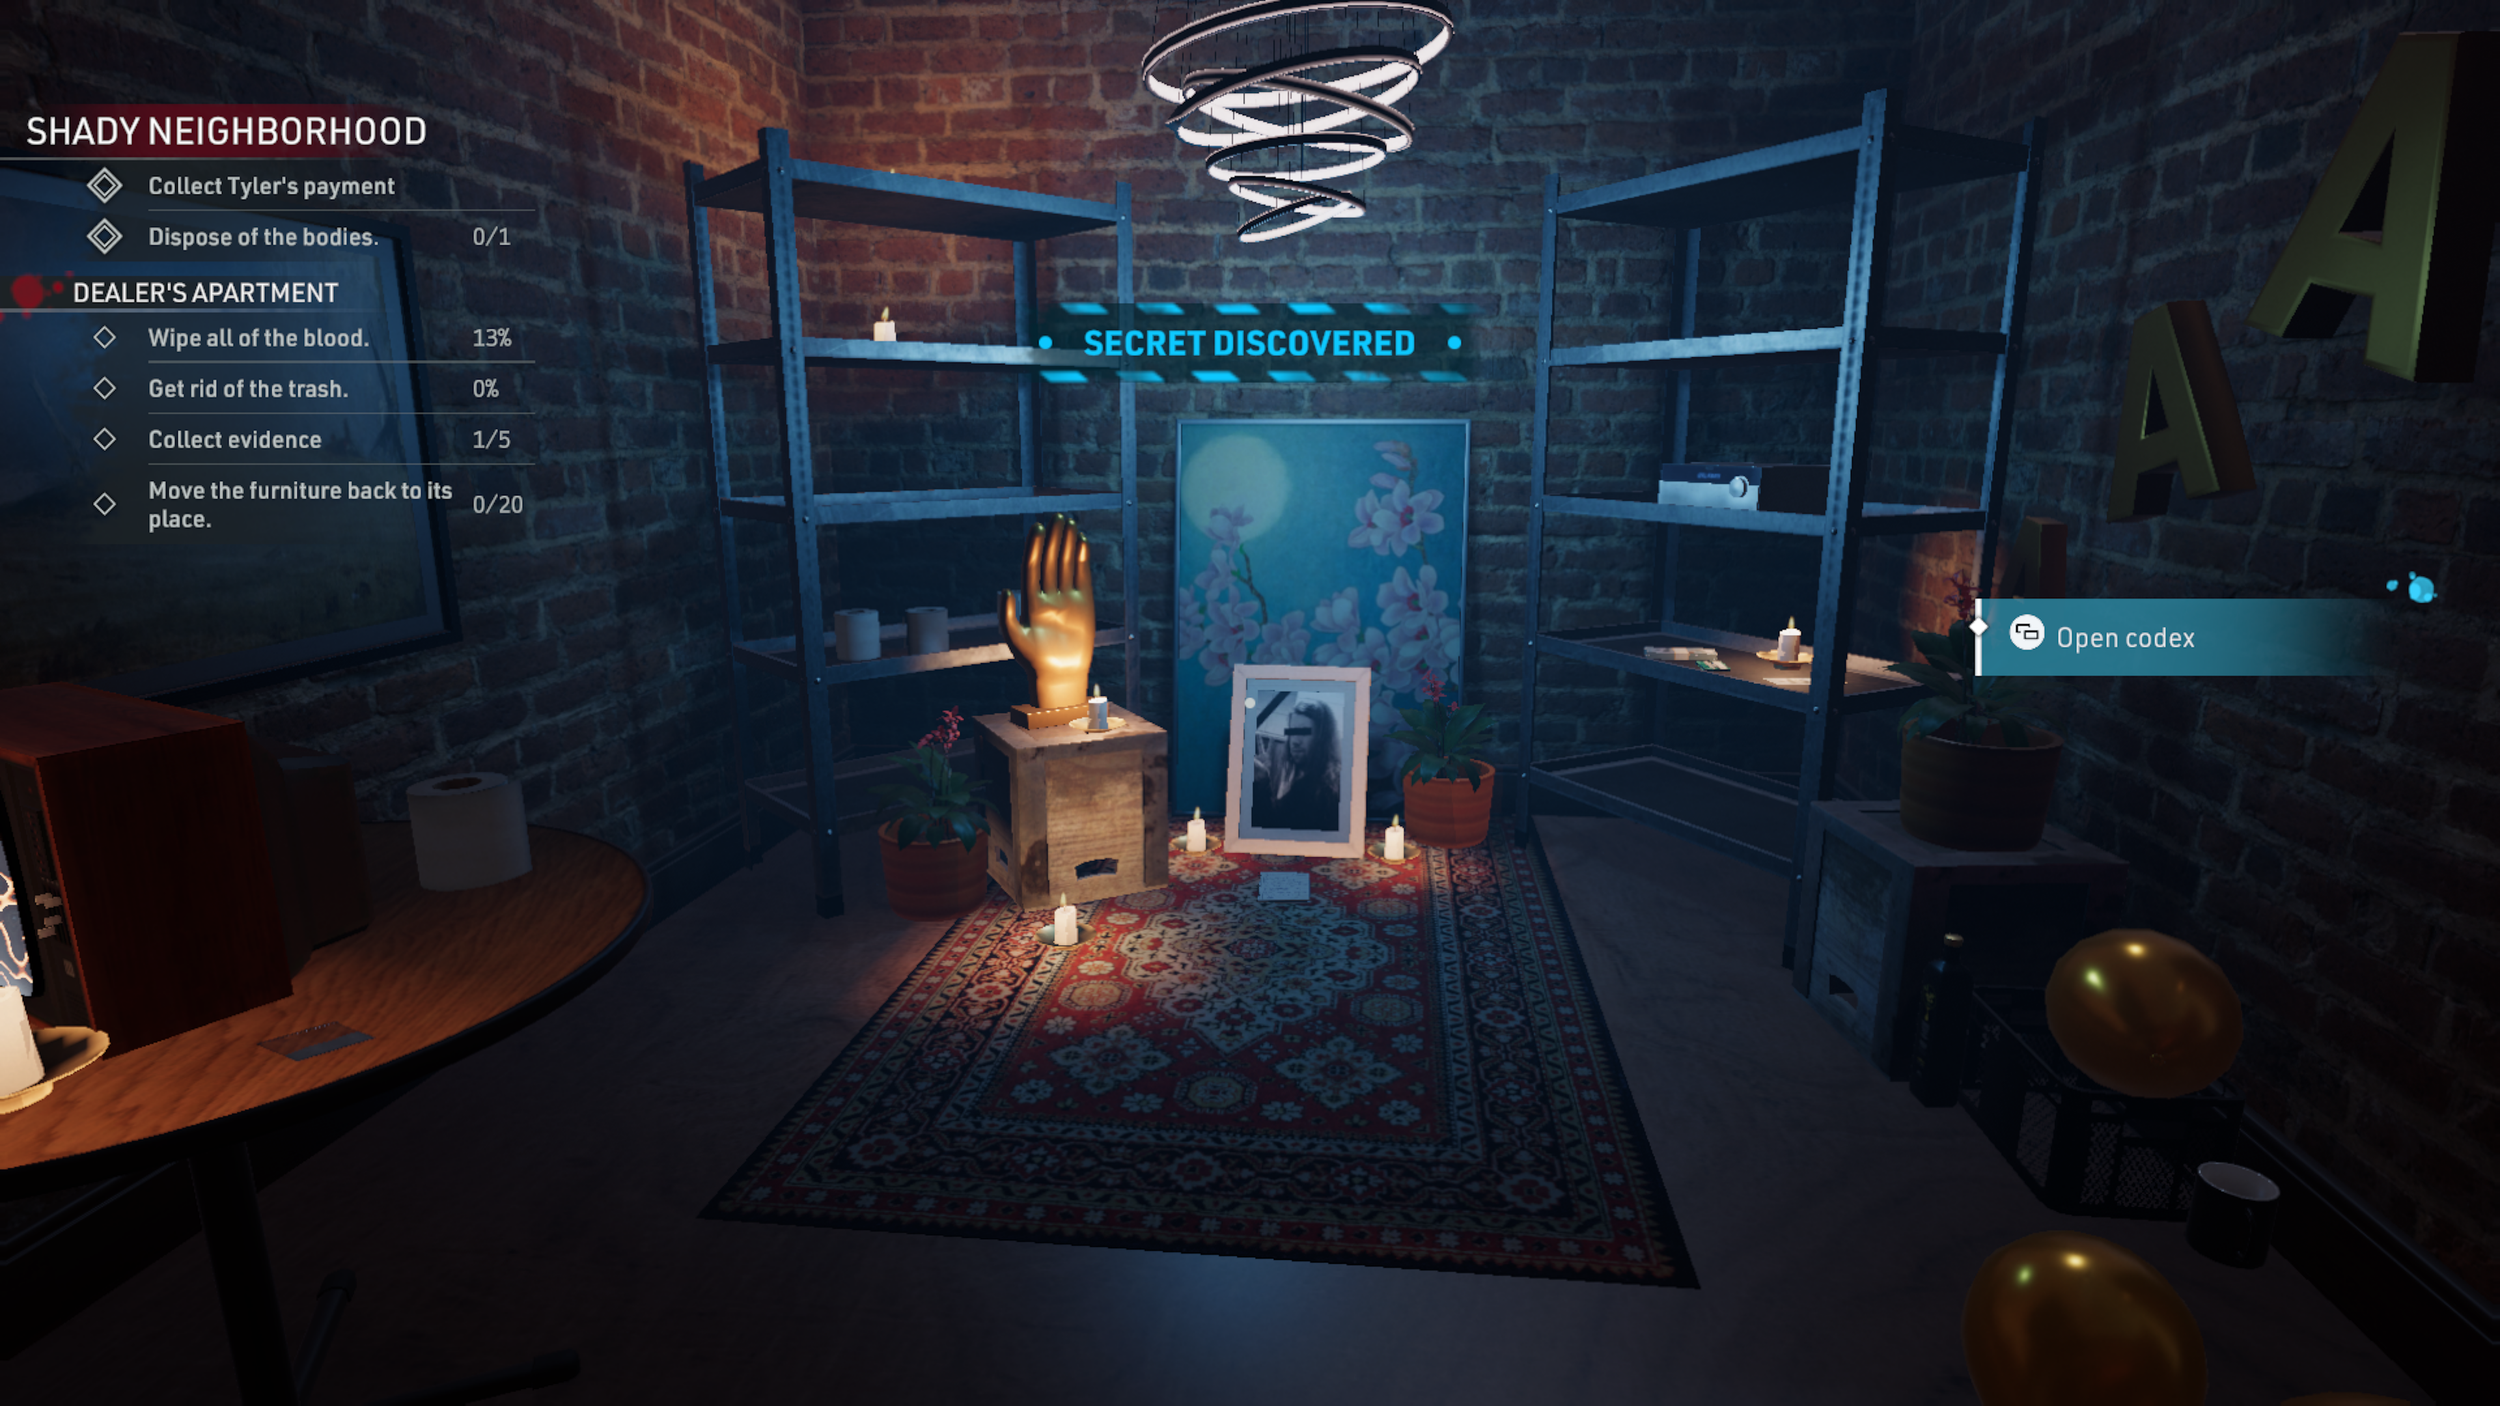
Tape 1: In the main area of the spa, to the left of the pool, you’ll see a closed door with a number panel on the wall. ‘Hack’ the panel to gain access to the room; in which you will find the first Tape: “Kapushi Clouds”, also known as “Relax” in the Mission Complete screen.

Tape 2: After you drain the pool, you will be able to grab Locker Card M017. Head back into the Men’s Locker Room and open up Locker M017 to find the next Tape: “Out of the Hood” (also known as IceColdBobby in the Mission Complete screen).


Secret 1: In the Tanning Room, on the table to the right you’ll find Locker Key W024. Go open the relevant locker, to find Locker Key M034, which once unlocked, will then give you access to a VIP Card. Take the VIP Card into the little maintenance room, and on the wall to the left of the PC you’ll see a VIP Panel, where you can scan the Card to unlock the VIP Area.
Unlocking the VIP Zone will also net you the Achievement ‘Gold On The Ceiling’.


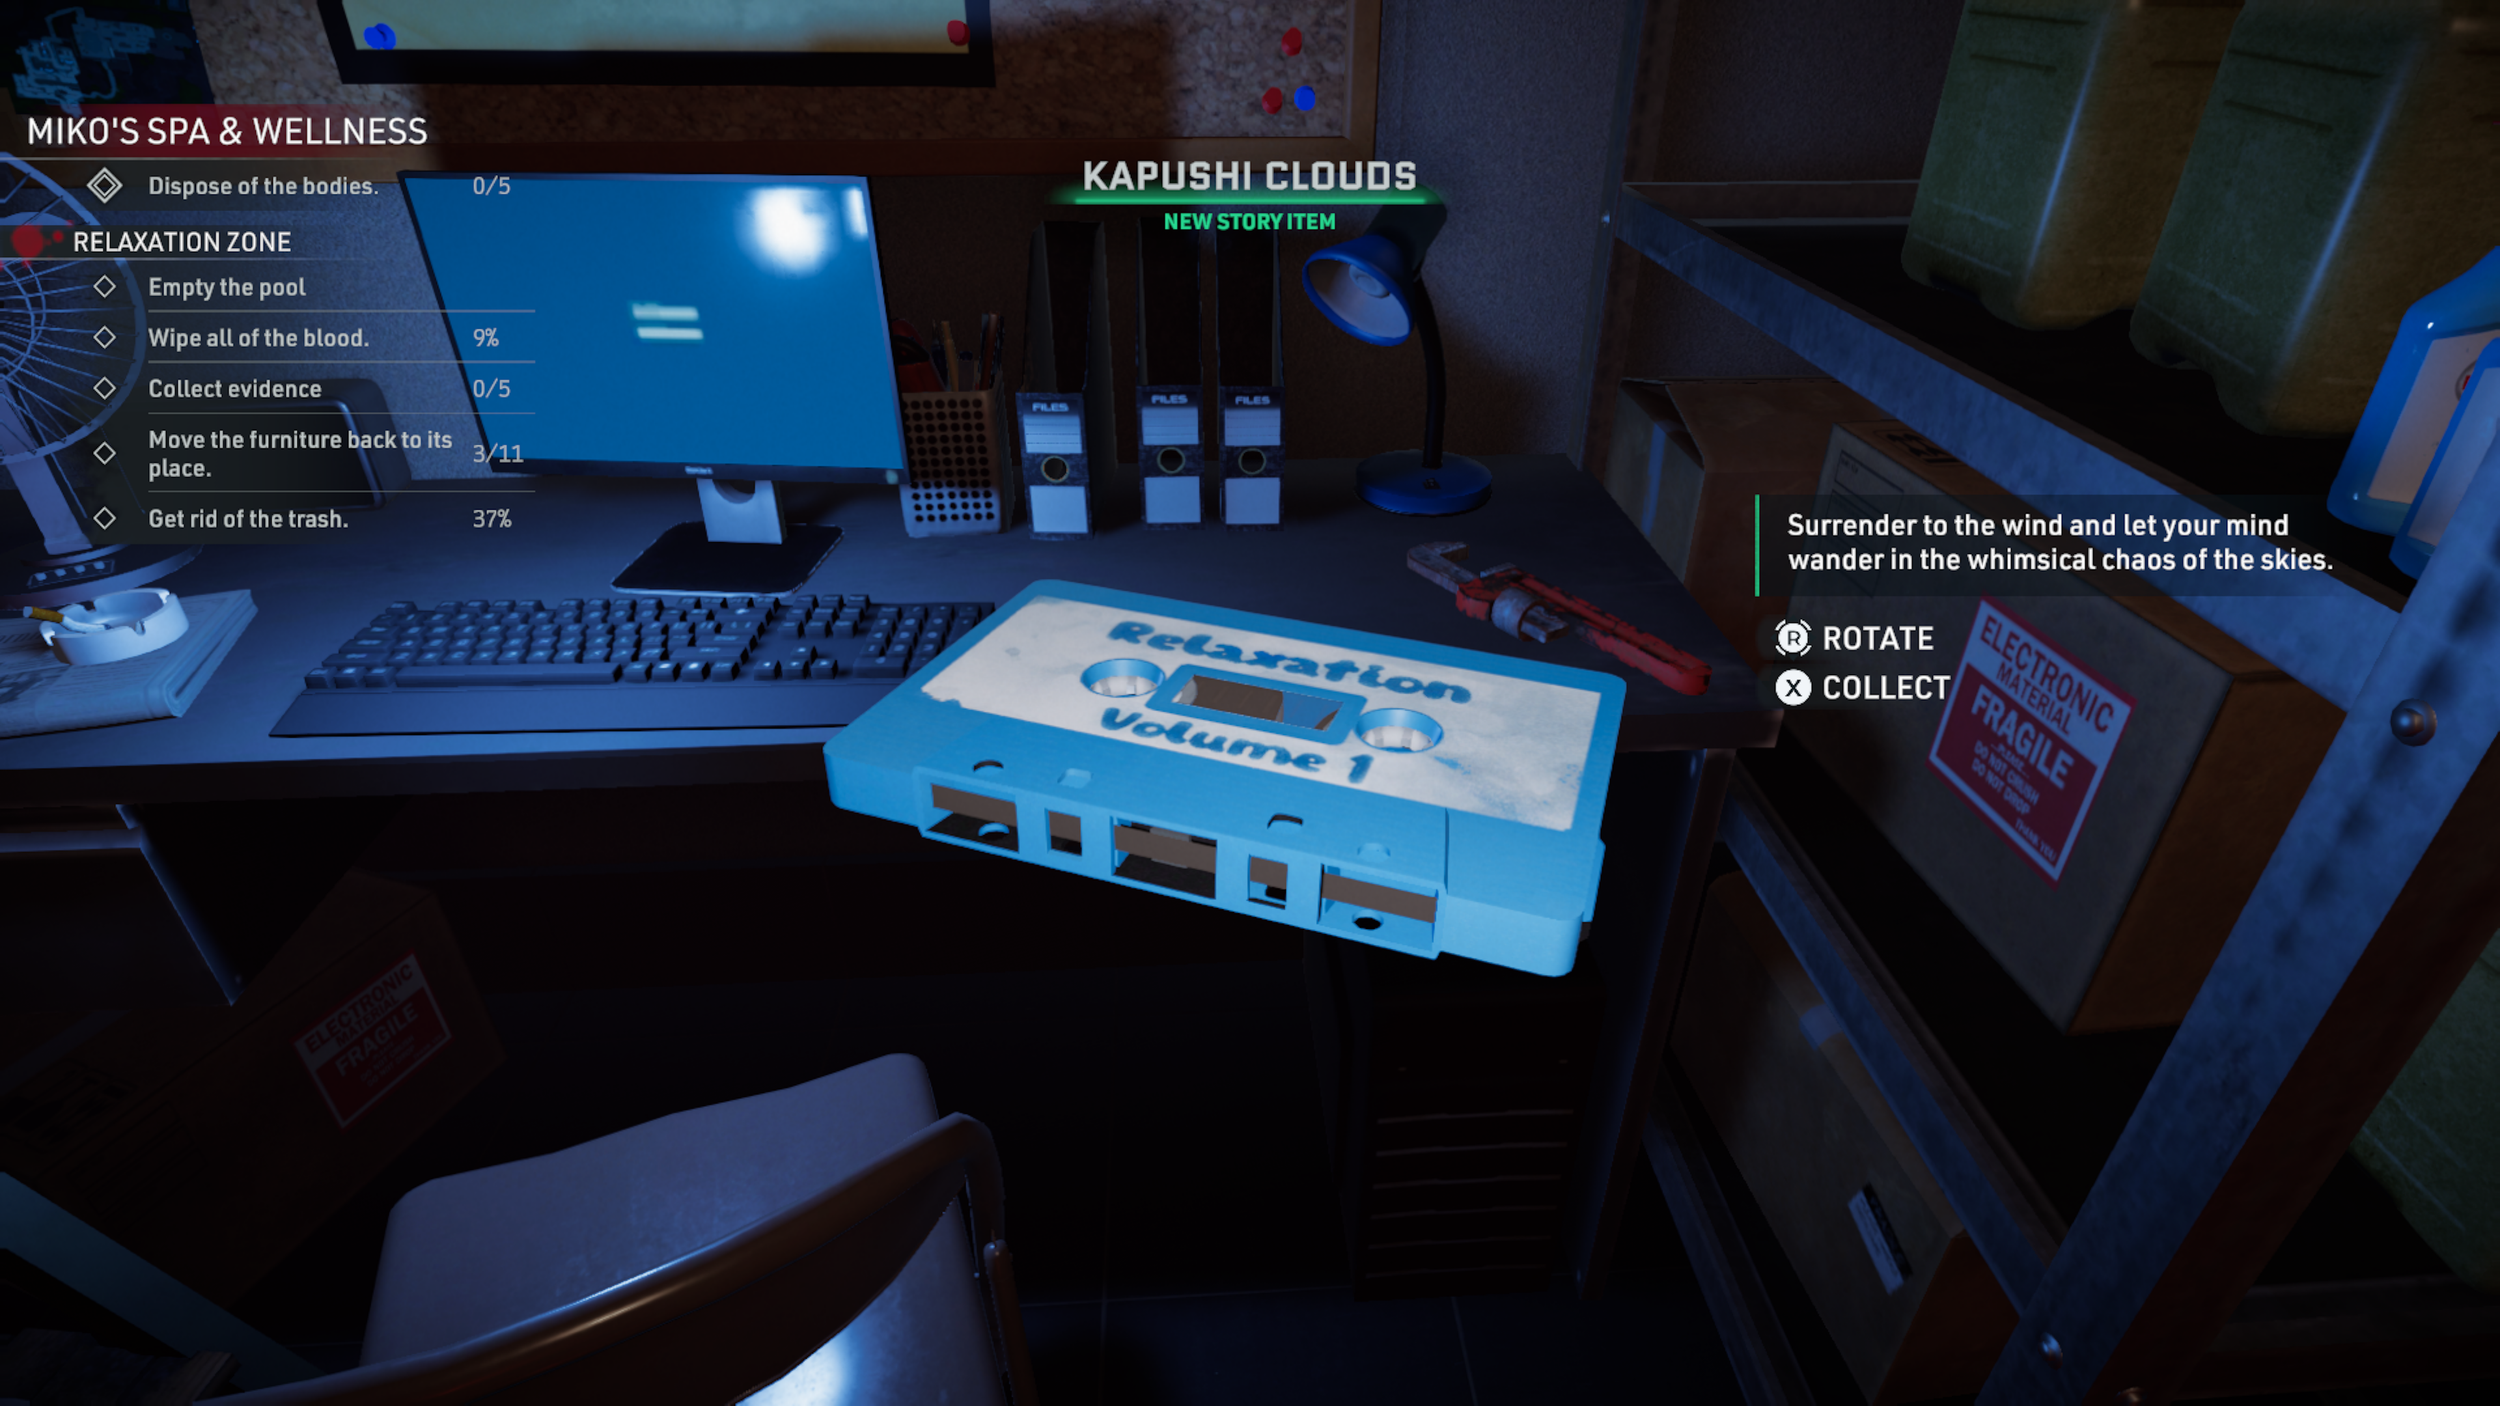
Tape 3: The Tape “Classical Music Collection: Dvorak Quartet No. 10, I. Allegro Ma Non Troppo” (titled Classical 2 in the Mission Complete screen) can be found in the VIP Room on the cabinet with the lion statue on it.

Secret 2: Within the VIP Zone, there’s another locker key W018 on the table; pick this up and open the corresponding locker in the women’s changing room to find the last secret.


Once you complete the level, you should then have everything as shown below.
Completing the level will get you the ‘Relax, Take It Easy’ Achievement; completing it with a Perfect Score will also gain you ‘Trial By Blood’.

Mission 3: Toxic Love
- Secrets: 1/1 - Tapes: 2/2 -
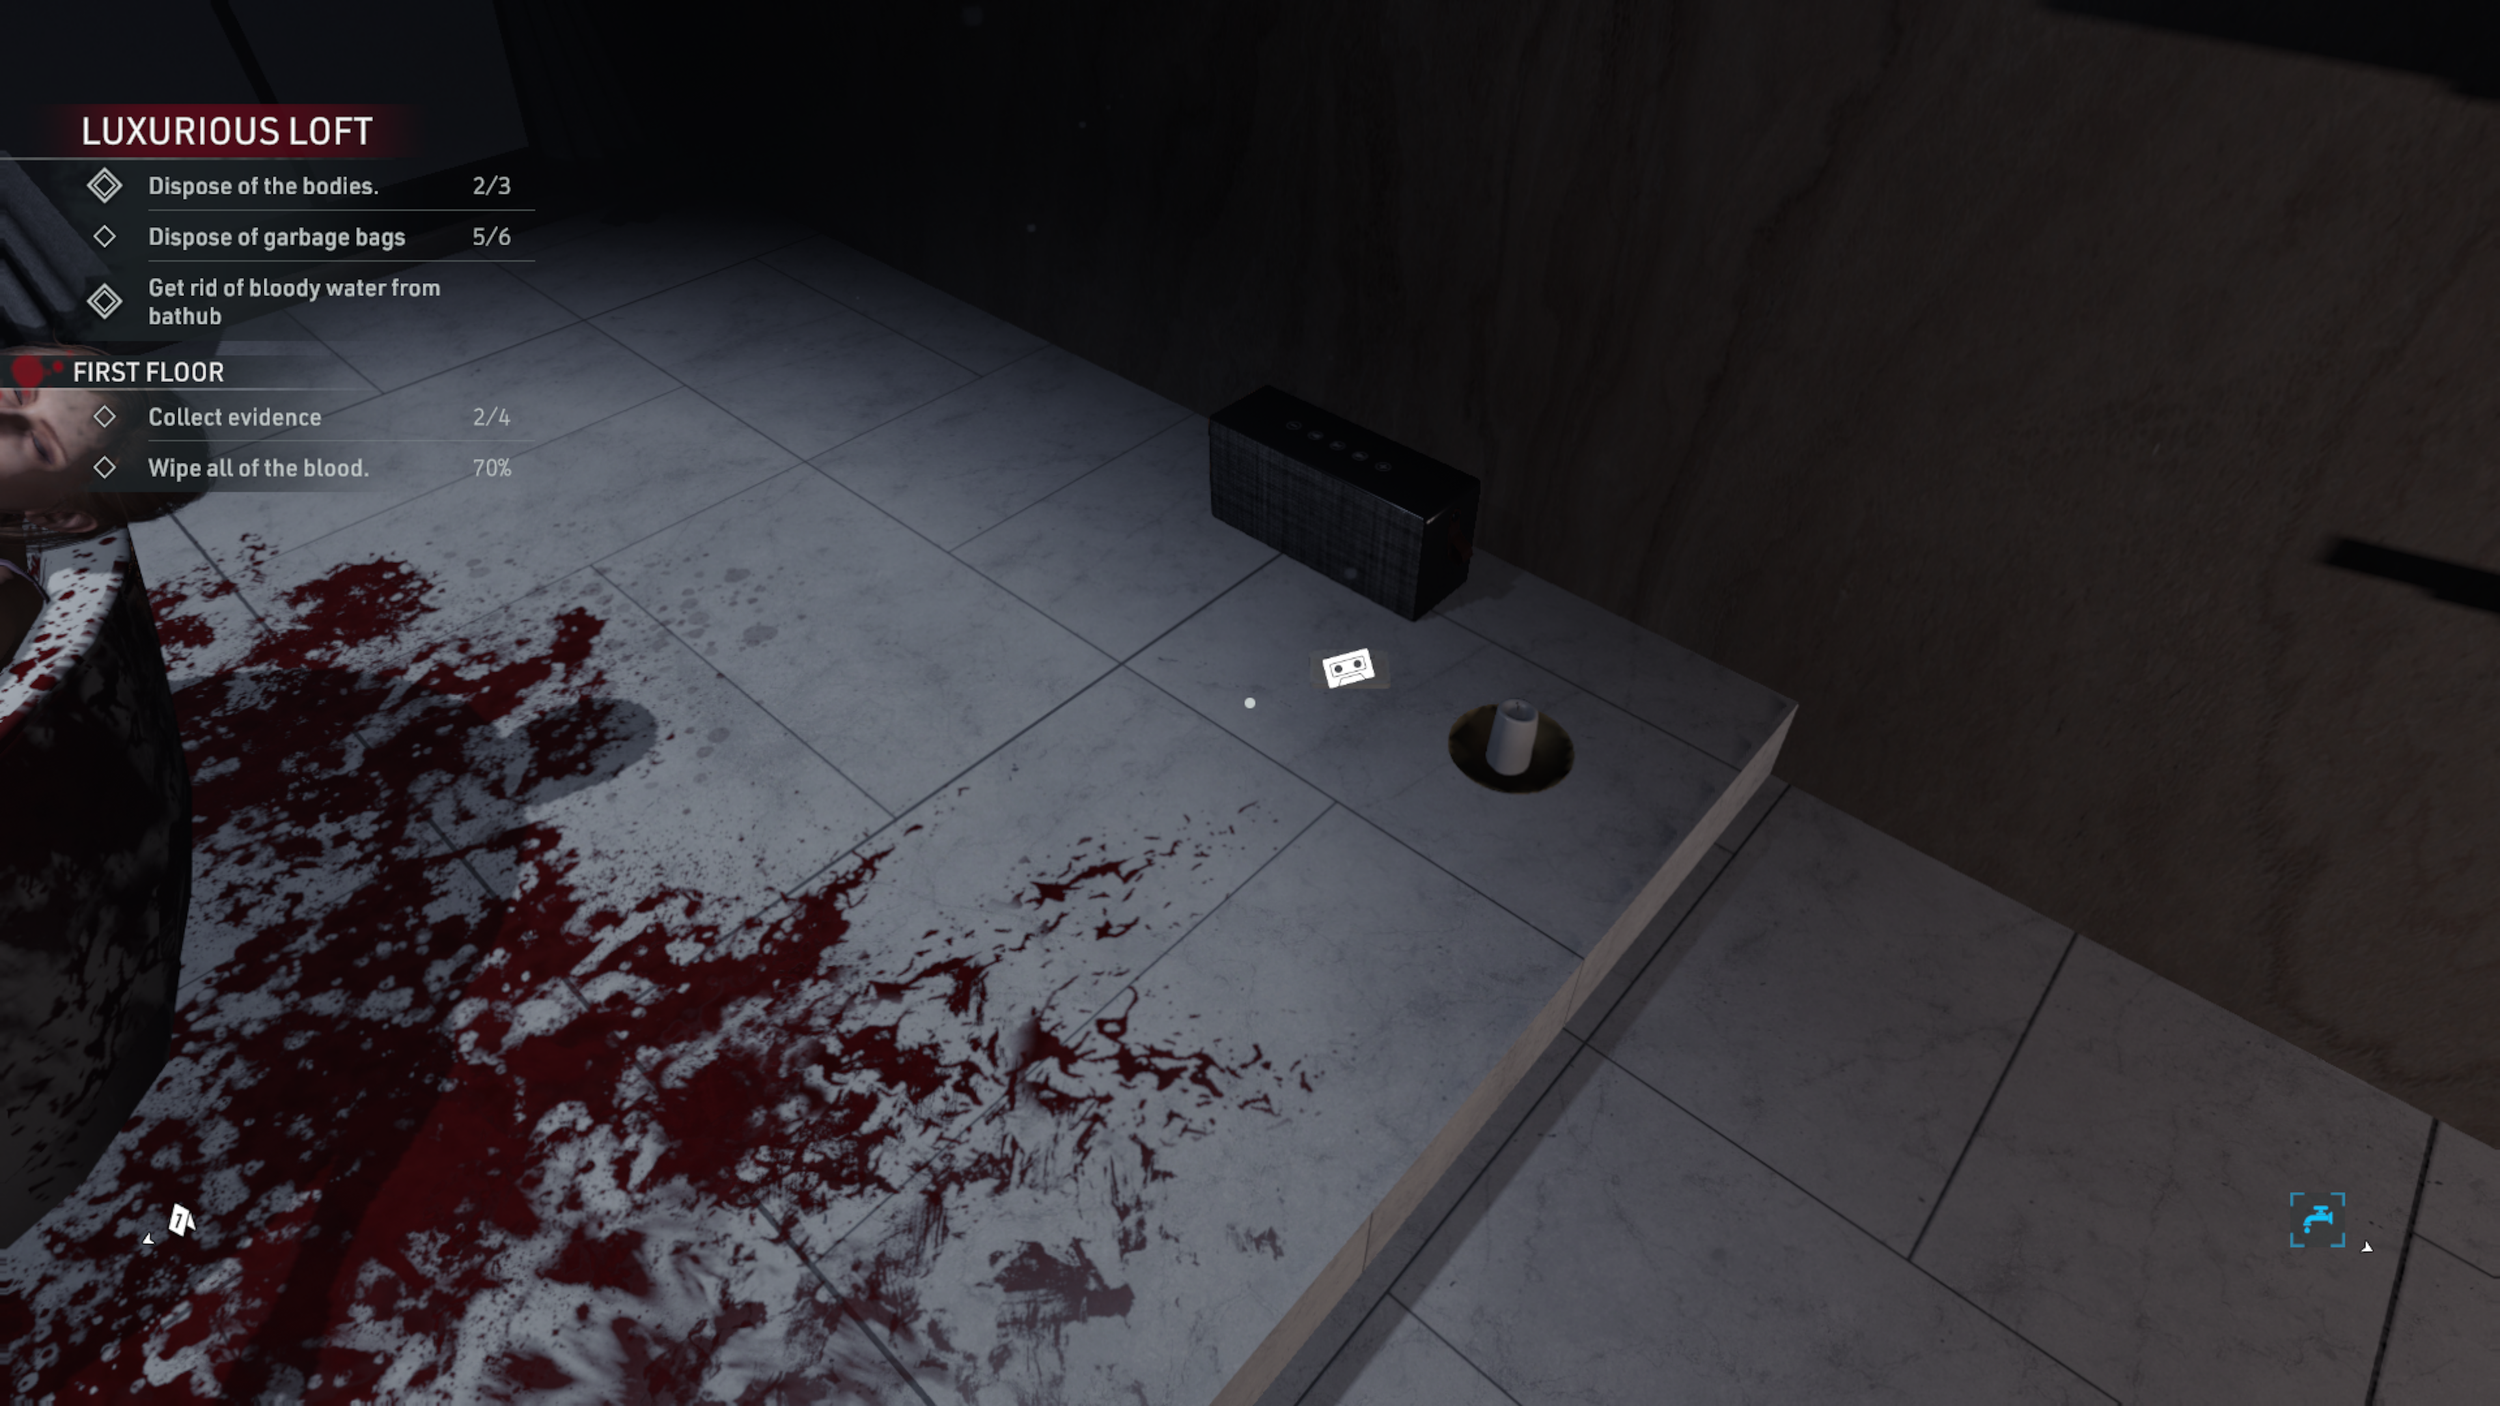
Tape 1: On a shelf in the main living room area of the Ground Floor, you’ll find the first Tape: “Purrfect Grooves”, otherwise known as “ChillHop” within the Mission Complete screen.


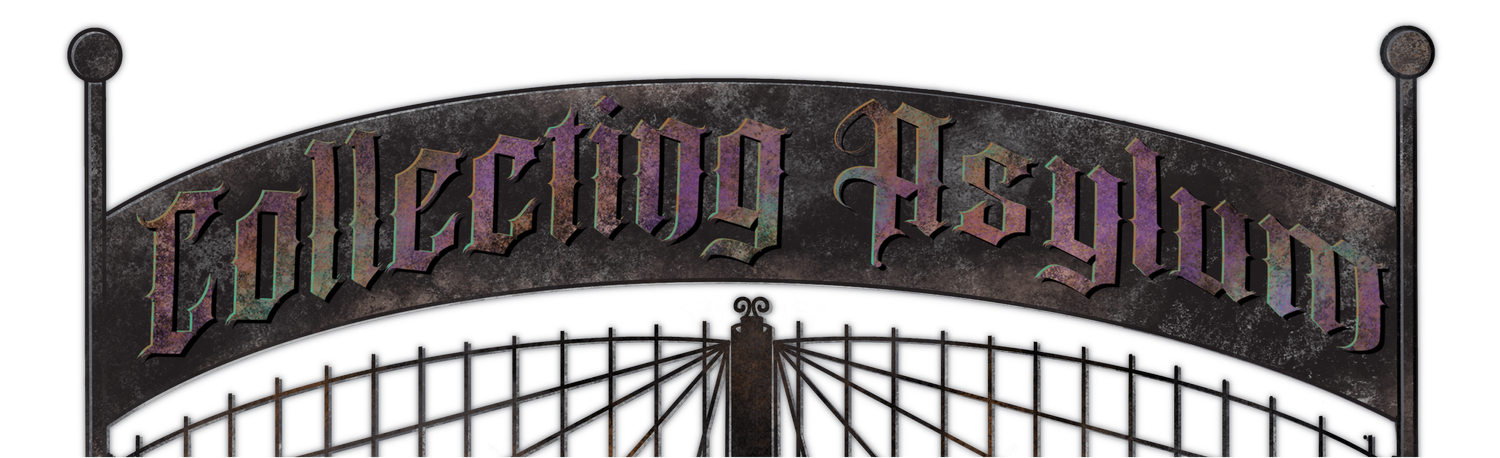
Secret 1: In the room behind the painting, you’ll see a chair facing a painting in a small corridor, there’s a hidden safe behind this painting with some valuables to steal; opening the painting will discover the Secret.
Technically you don’t need to open the safe for the Secret (why wouldn’t you, though?), but opening it will net you the ‘Get Lucky’ Achievement.


Tape 2: Once you’ve reactivated the power in the hidden room, you’ll be able to open previously locked doors in the house. Upstairs there’s a door you can now enter, leading you to a terrible scene. Over to the right of the bath, on the floor, you’ll find the next tape, titled: “Hi, I’m Ready to Die” (this will register as “LULU Suicide” both at the right of the screen, and on the Completion page).

Not as much to find in this level due to the smaller area, but still plenty of blood to clean up!
Completing the level will get you the ‘Can You Feel My Heart’ Achievement; completing it with a Perfect Score will also gain you ‘Toxic Love’.

Mission 4: Short Circuit
- Secrets: 2/2 - Tapes: 2/2 -
Secret 1: When cleaning the upstairs hallway, you’ll notice one of the wall sconces is lopsided. Fix it to uncover the first Secret area, with a wall opening up at the opposite end of the hallway. Head over to the newly opened area to discover the Secret.
Interacting with the sconce will get you the ‘Another Brick in the Wall’ Achievement.


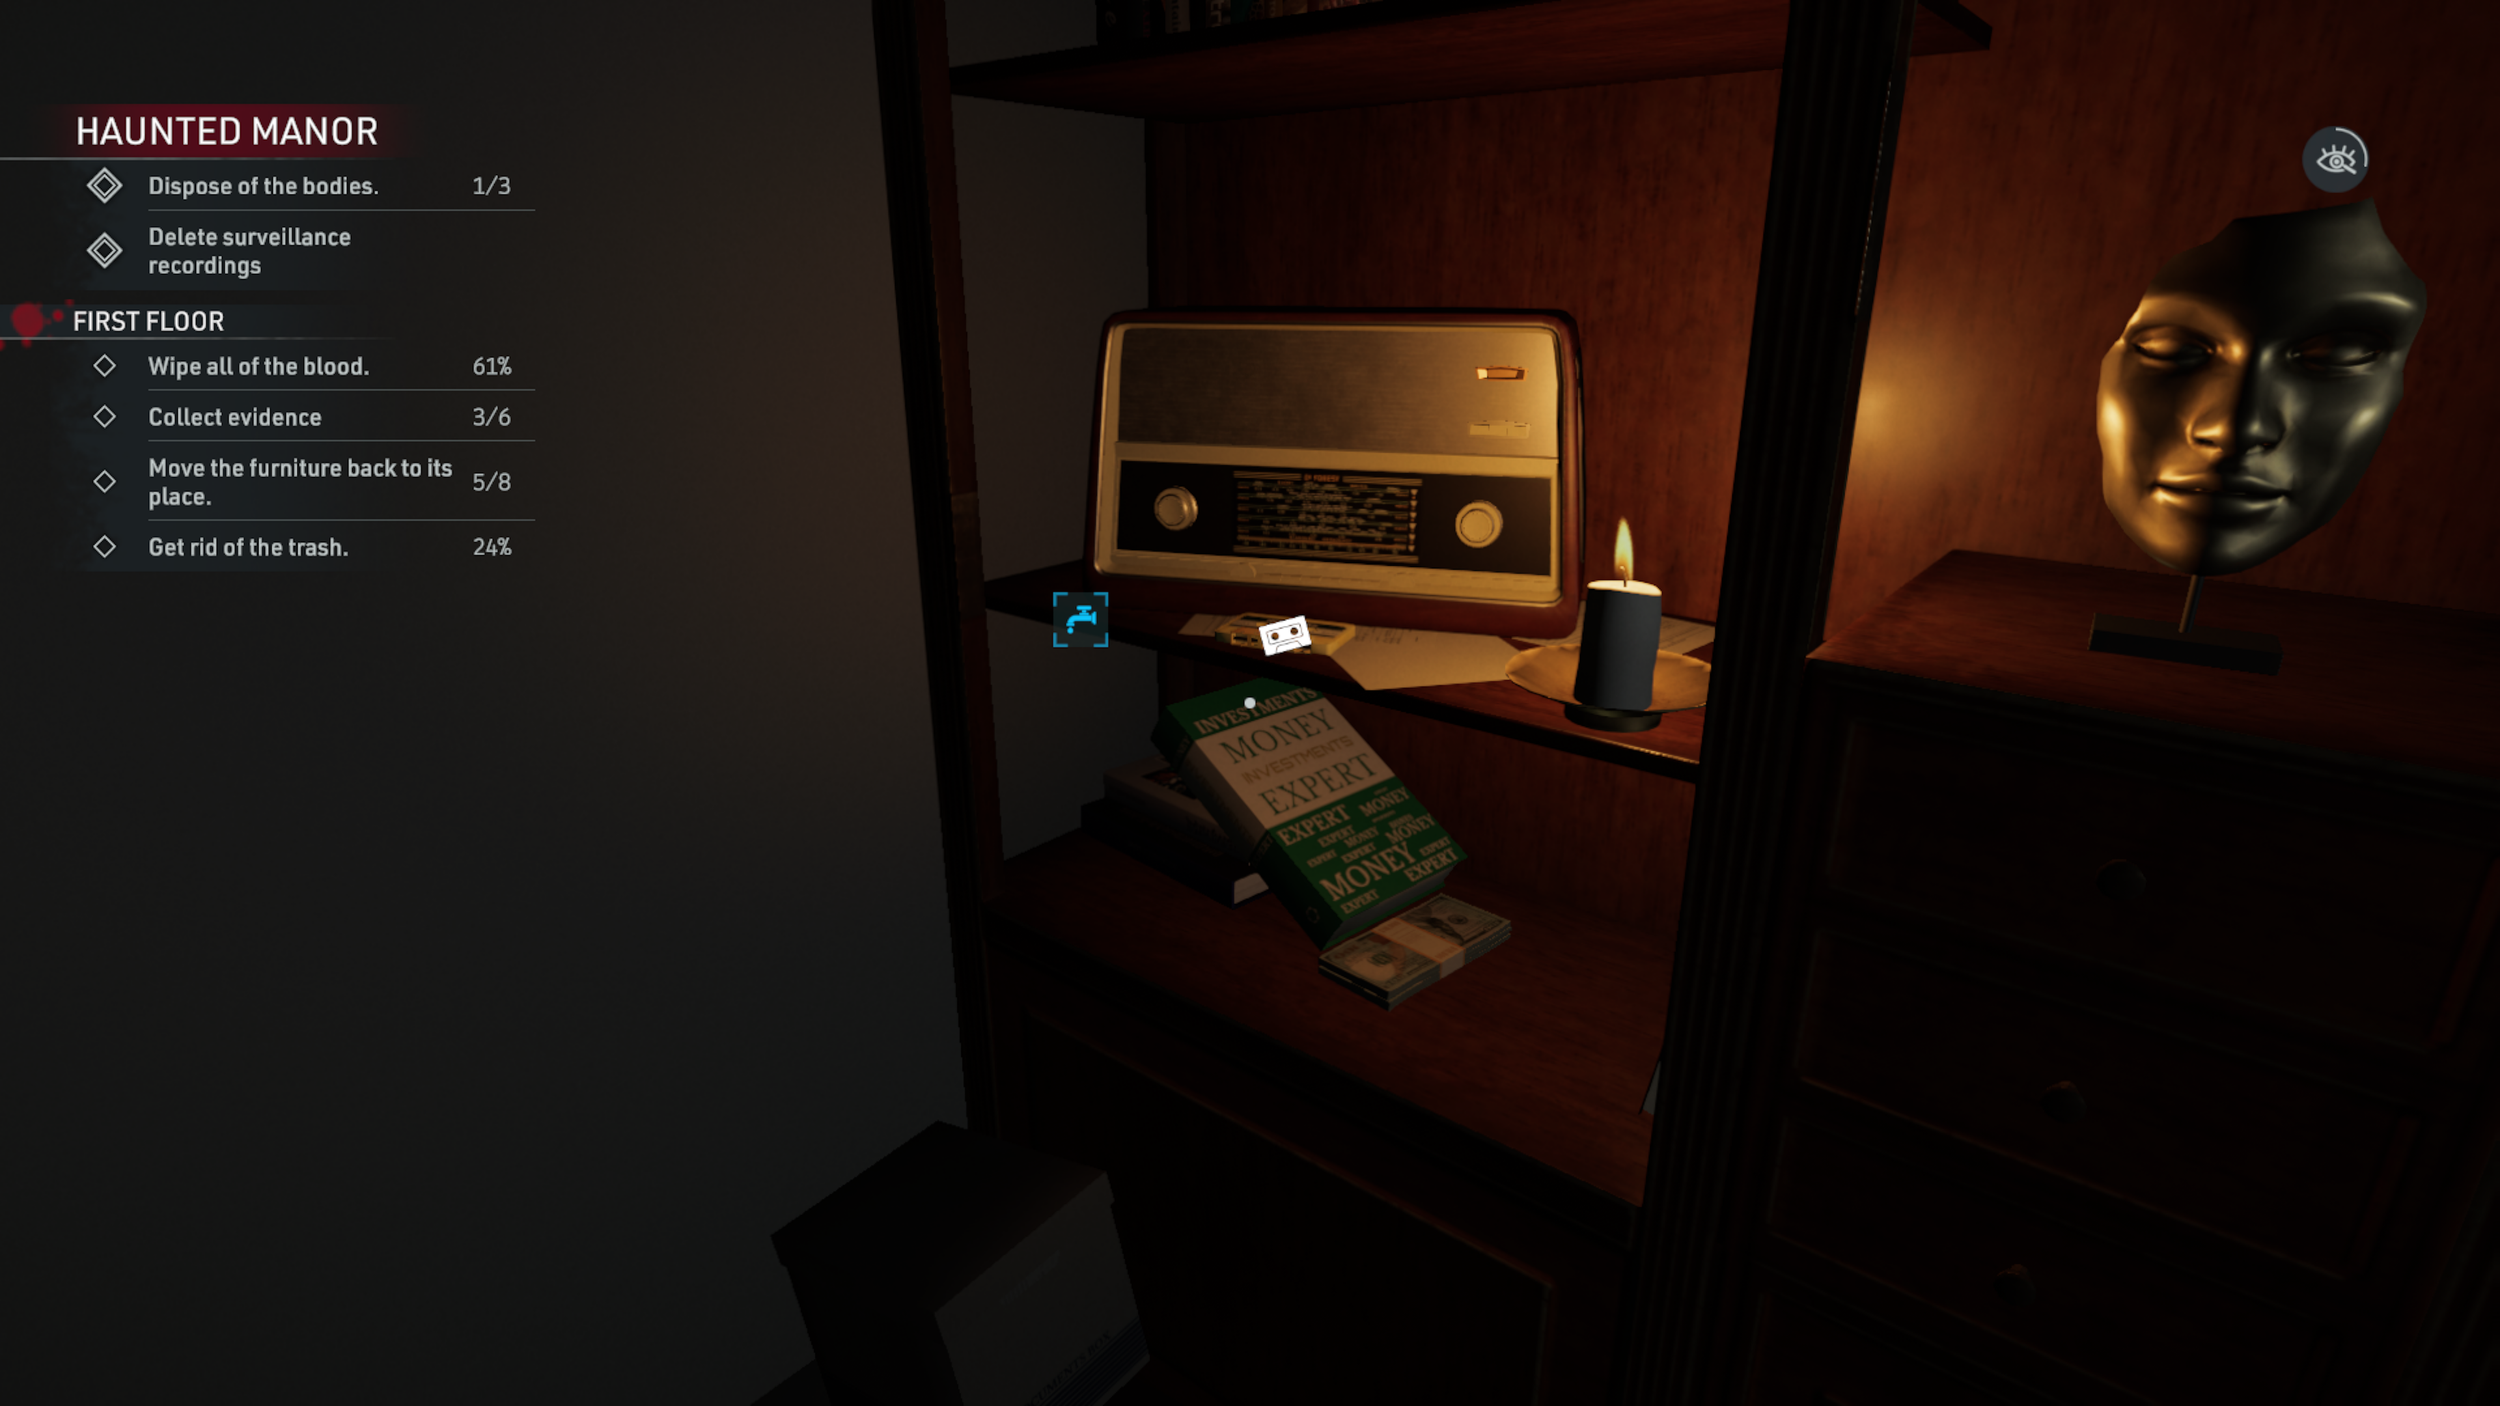
Tape 1: Upstairs you’ll find an office styled room, where you can find the first tape - the music playing sounds mega creepy, and really gave off Insidious vibes to me (think of the music that plays over the videos). Over on the left hand side when you enter, you’ll see a radio on a shelf with the source of the creepy music, the first Tape: “Holy Wota”.

Tape 2: After you’ve done some more cleaning, head back to the room you found the first tape in, and you’ll find a new tape where the original one was. This time, the Tape is titled “Girampas”. This one can be easy to miss, since you already looked here and retrieved a tape before, but this house is spooky… remember?


Secret 2: In the kitchen, to the left of the fridge you’ll see a small door. Open the door and go inside to find the next Secret area, with some valuables to steal.


Before you finish the level, make sure that you’ve gone in and watched the cat video TV in the little lounge (you might need to walk quite close for it to register); this will gain you the ‘Hail To The King’ Achievement.
Once you’ve finished everything and you leave to complete the level, you should have everything glowing blue as shown below.
Completing the level will get you the ‘Technical Difficulties’ Achievement; completing it with a Perfect Score will also gain you ‘Short Circuit’.

Mission 5: Italian Job
- Secrets: 3/3 - Tapes: 3/3 -
There are three guitars within this level, that once you’ve interacted with all three, will gain you the Achievement “While My Guitar Gently Weeps”. Locations will be mentioned more specifically below, as these are all nearby to other collectibles.
Tape 1: On the chest of drawers in the Restaurant office, behind the desk, you’ll find the first Tape: “Prosciutto Core”.


Secret 1: At the end of the back alley there is an unlocked door (the only one you can enter in the back alley that isn’t to get into the Restaurant). Go inside here and follow the path around, to find wooden slats blocking your way. Break these and crawl under to find the first Secret area, with some valuables to steal.


Additionally, the first guitar you need for the Achievement is in the above Secret area. Interact with this guitar to work towards the Achievement (1/3).
Secret 2: Within the back alley, just to the right of the gate that leads you back to your car, there is a wall with barbed wire on top that has a break in it at the left. There are already some bricks and pallets set up to allow you to climb up most of the way, but you’re gonna need a step ladder to actually get over the wall. If you haven’t already unlocked this in the Skill Tree, don’t worry, there’s a step ladder nearby in the back alley. Grab the step ladder and put it up onto the wooden pallets, as this will be the final step to climb over into the Secret area: the Rowbau concert venue.


The above secret will also gain you the ‘Rock and Roll All Nite’ Achievement once found.
Tape 2: Within the Rowbau concert venue, on top of the speakers beside the drum kit, you’ll find the next Tape: “Sonne und Hell”.


Also in this area, you’ll find a guitar leaning up against the speakers. Interact with this to continue working towards the Achievement (2/3).
Secret 3: In the Restaurant office, underneath the dart board there is a hatch that will lead you down into a Secret basement gambling den.


Tape 3: Within the Secret basement, over on a chest of drawers to the right you’ll find the next Tape: “Swishi Swoop” (otherwise known as “SoftJazz” on the Mission Complete screen).


On the left hand side of the basement you’ll see a Safe on the wall. Crack the safe to find some valuables, and get yourself the ‘Treasure’ Achievement in the process.
Also down here, you’ll find a white guitar over to the back right, nestled between a statue on a table, and a display cabinet. Interact with this (3/3) to gain the Achievement ‘While My Guitar Gently Weeps’.

Once you’ve grabbed everything you need, and completed the Mission, you should have everything show on the Mission Complete screen like the below image.
Completing the level will get you the ‘Gangsta’s Paradise’ Achievement; completing it with a Perfect Score will also gain you ‘Italian Job’.

Mission 6: Affair with Death
- Secrets: 3/3 - Tapes: 4/4 -
Tape 1: Upon starting the level, a Tape will automatically be unlocked: “Echoes of Crime”. This one causes a lot of confusion as it isn’t obvious that you’ve gained a tape, until you see it at the Mission Complete screen.
Tape 2: As you enter the villa, to the right is a large TV with some astronaut statues in front of it. On the table in front of these statues - and to the left of a radio - is the first Tape: “Dvorak Quartet No. 12 Op. 96” (Classical Music Collection 3).


Tape 3: In the bedroom next to the massive fishtank at the bottom of the stairs, there is a chest of drawers next to the bed, where you’ll find the second tape: “Maranashi” (aka “Relaxation Volume 2”).


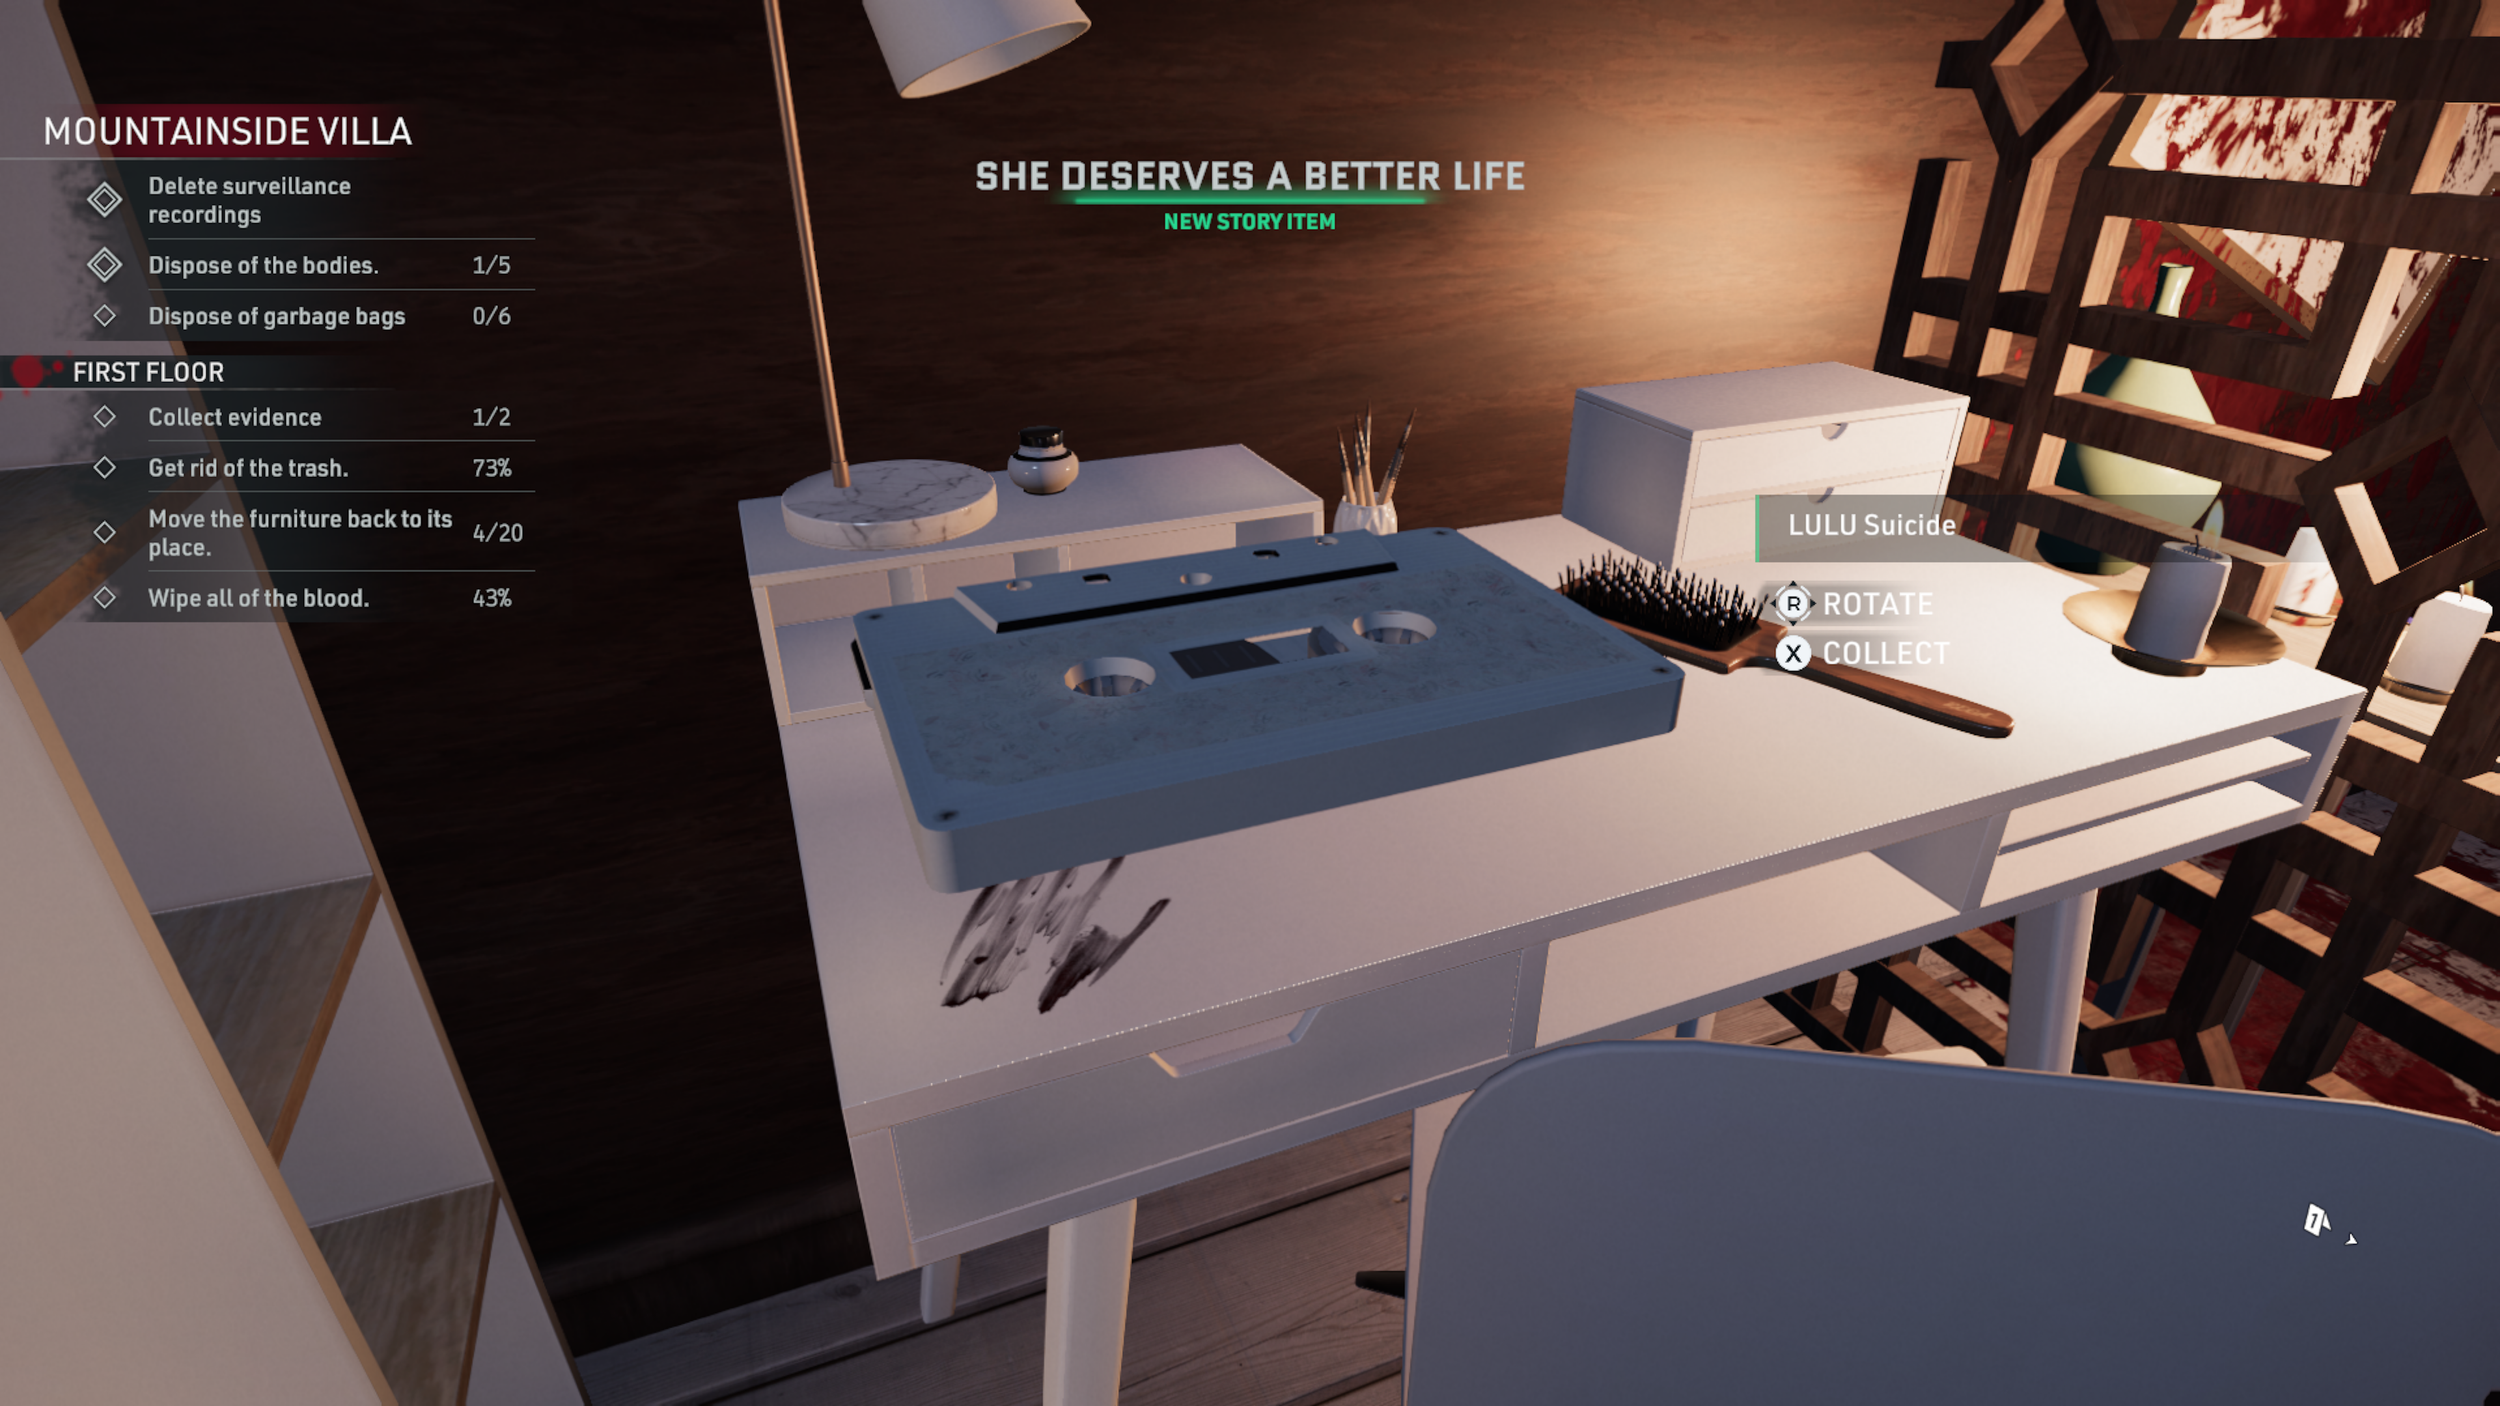
Tape 4: In the upstairs bedroom (same room as the door to the balcony with the body hanging over the railing) you’ll find the third tape on a vanity table, titled: “She Deserves a Better Life” but shown as LULU Suicide at the side and LuluSuicide2 in the Mission Complete screen.

Secret 1: Upstairs you’ll find the laundry key, which can be used to open the locked door directly opposite the entrance to the villa (to the left of the bathroom). Open this door to discover the secret - and some valuables.
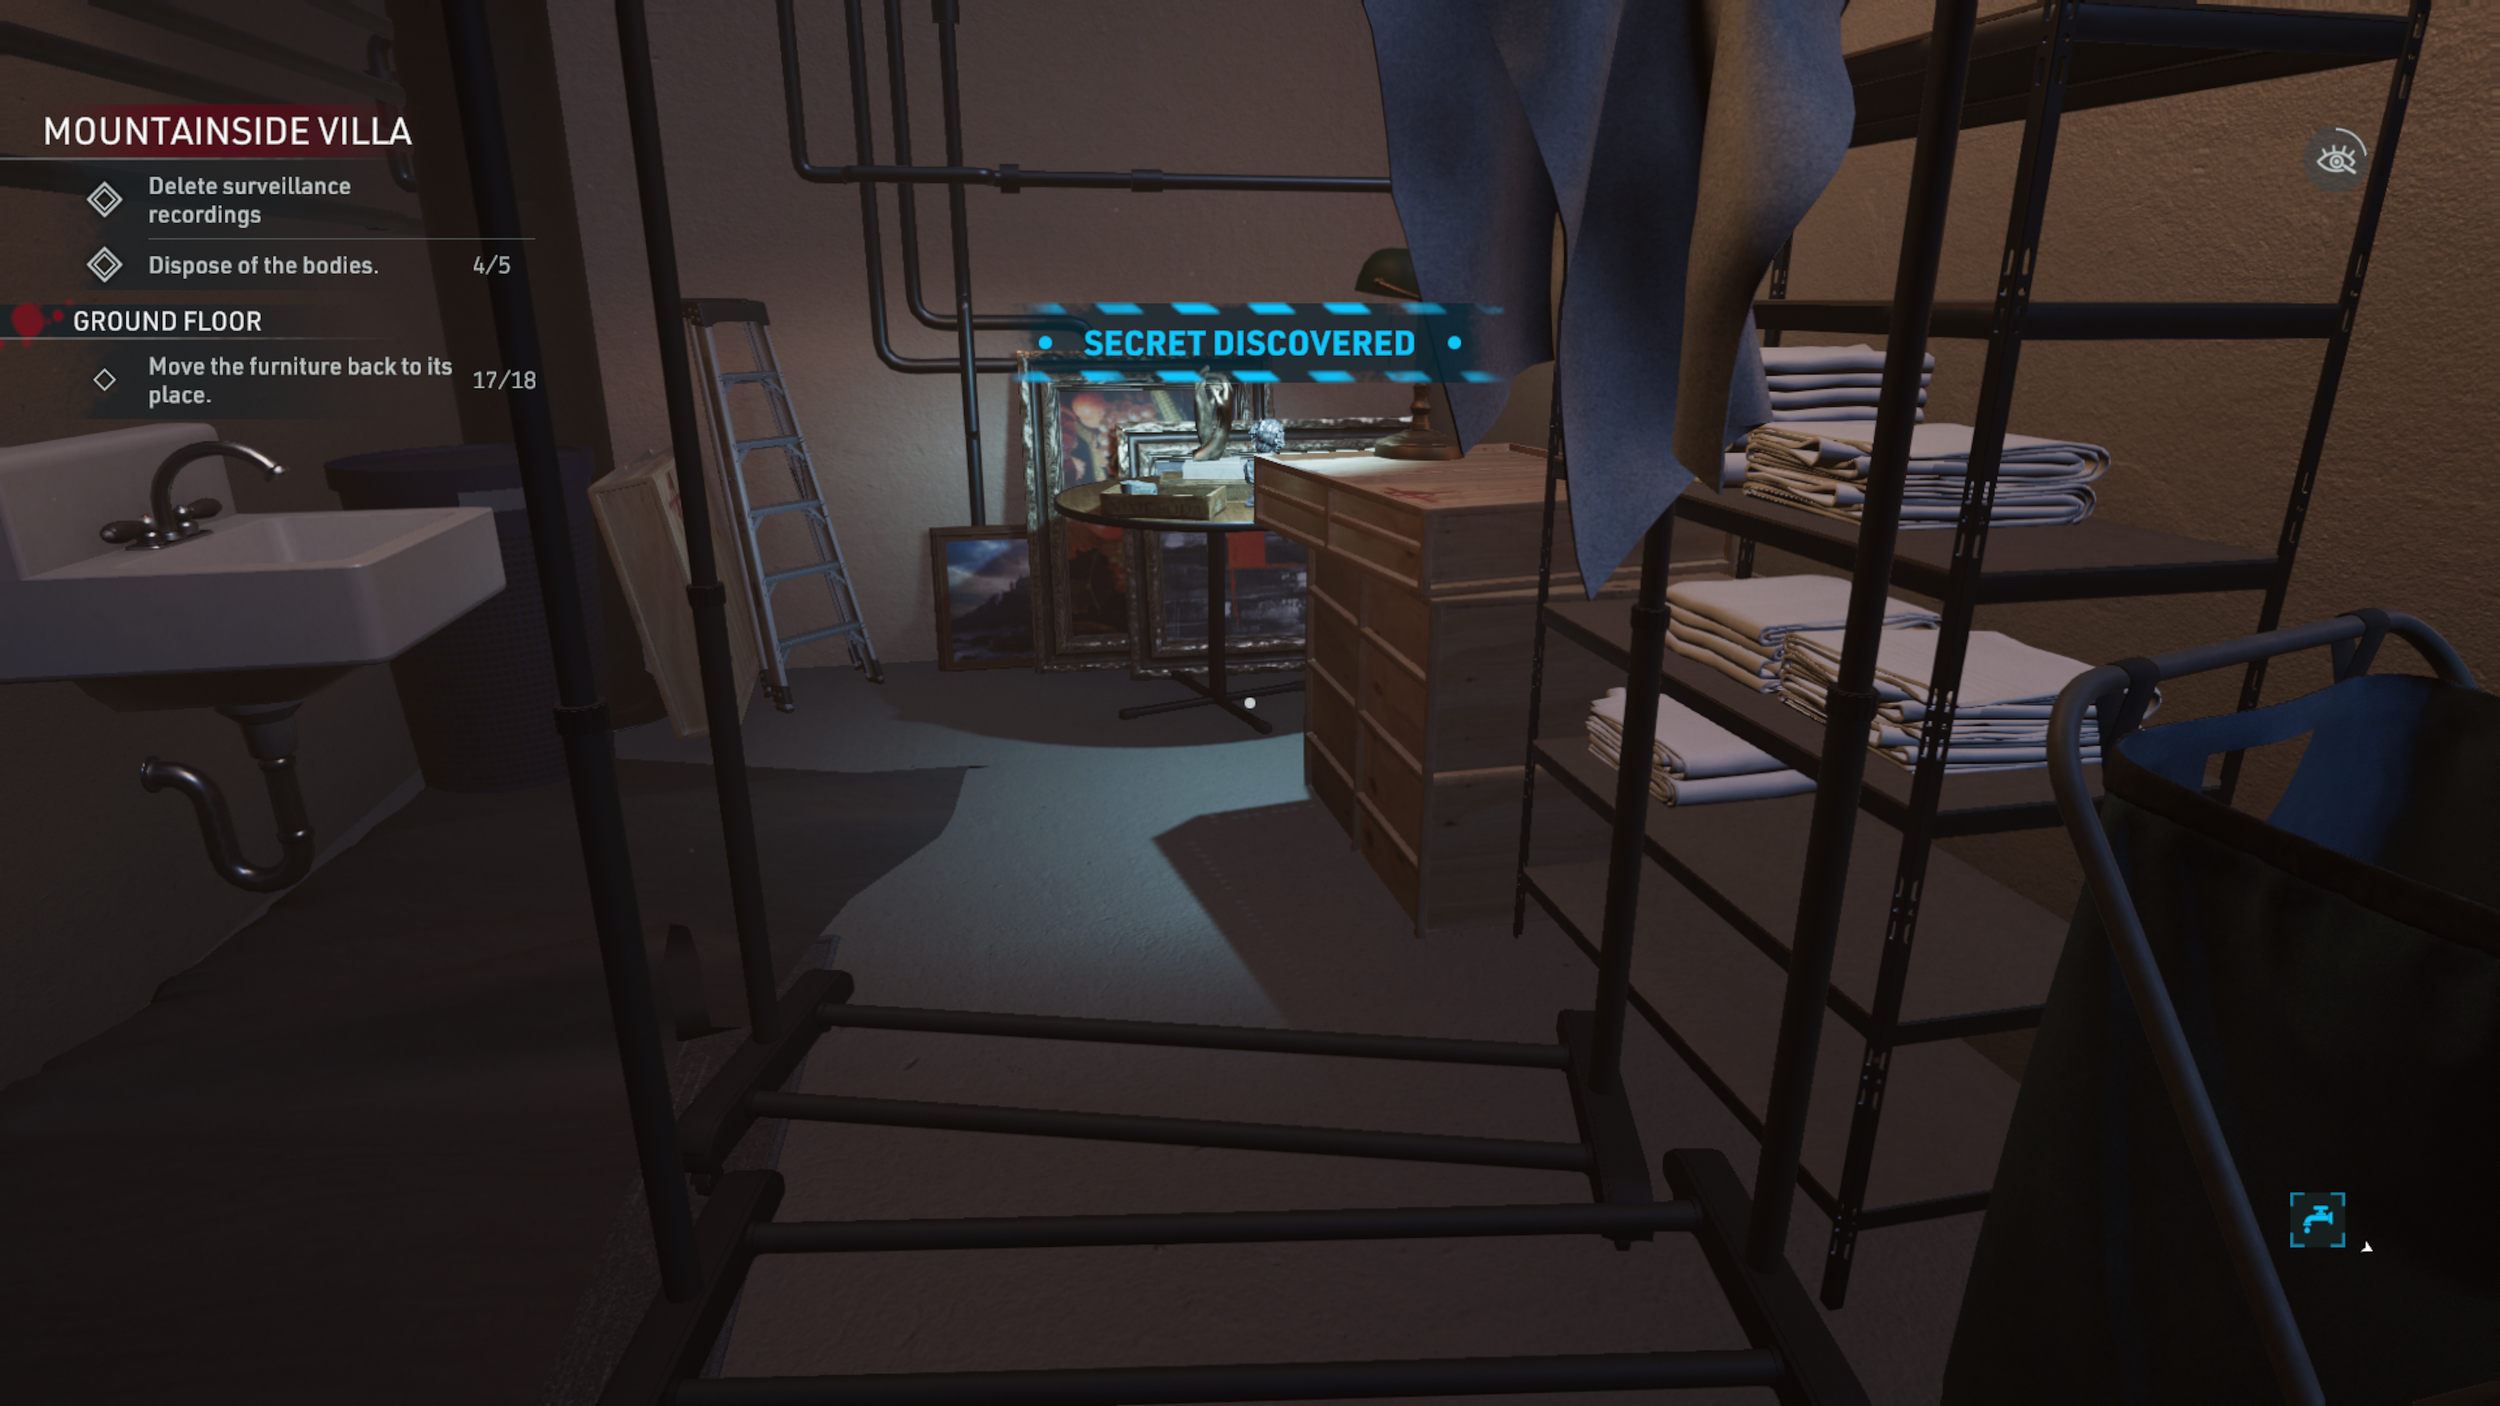
Secret 2: Downstairs in the basement, behind the torture victim, you’ll see some cardboard boxes sloppily hiding a gap in the wall. Go through the gap to uncover the next Secret, a trolley full of cash that sadly isn’t anywhere near as valuable as it appears to be.
Collecting all the ‘cash’ will get you the Achievement ‘Money for Nothing’.


Secret 3: Behind the basketball court outside, there’s a wall that leads behind the net to a Secret area. Walk across and head straight into the corner behind the tree to unlock the Secret.


And that should be that for this level :)
Completing the level will get you the ‘Bad Romance’ Achievement; completing it with a Perfect Score will also gain you ‘Affair With Death’.

Mission 7: Friendly Fire
Secret 1: In the main living room area in Tyler’s apartment, over at the left hand side there are shelves on the wall. One of the lower panels of the wall can be opened (shown below) to reveal a Secret hidey-hole with some valuables inside.


Tape 1: Go to the furthest away room in the apartment to find a mini recording studio. On the table to the right of the keyboard, you’ll find the next Tape: “Garnacho” (titled Garnachhio in the Mission Complete screen).


Secret 2: In the bathroom, up above the washing machine, you can see a vent with the cover slightly hanging off. Climb up and open it up to find some valuables stashed away in a Secret area.


Also in the bathroom, you’ll see a pyramid of toilet rolls stacked on a shelf. Knock them all down to get the ‘Pyramid Song’ Achievement.

Tape 2: In the kitchen area, there’s a set of shelves with water and beer on it, with the next Tape: “The End”, waiting for you. This one is titled “Tyler HipHop” in the Mission Complete screen.


That’s everything for the Friendly Fire level - another slightly quicker level in terms of collectibles.
Completing the level will get you the ‘Another One Bites the Dust’ Achievement; completing it with a Perfect Score will also gain you ‘Friendly Fire’.

Mission 8: Party’s Over
Tape 1: In the cabin on the right, go inside and into the dark hallway ahead of you to the left of the ladder. There’s a door to a bathroom through here, where inside you will find the first Tape, “Over Again“ on the bathroom counter (titled Lysander Eyes in the Mission Complete screen).


Secret 1: In front of the left-most cabin (the one with all of the building work being done), there is a bush hiding an opening. Duck down and follow the path; it will first pop up with a new location being found, but continue to move forward and you will eventually come out to the actual Secret, a little proposal area.
Finding this area will also unlock the Achievement ‘Single Ladies’.


Tape 2: Also within the proposal area, you’ll find a bench with a cassette player on it, and naturally, a new cassette for you to collect. Head over to pick up the next Tape: “Lost for You” (titled Alindo in the Mission Complete screen).


Tape 3: Inside the Party House, on the cabinet in front of the TV you’ll find the next Tape: “Voltage Resonance” aka “ATARAK”.


Secret 2: This ones a little easier to miss as it’s kind of off-the-beaten-track, however if you go back to the Cabins area and go all the way over to the right hand side, and walk down the side of the cabin to the back, you’ll see some wooden planks blocking up a gap on the fence. Break these down and go inside for the Secret.


And once you’ve found everything you need in this level, your end screen should look like below.
Completing the level will get you the ‘Smells Like Teen Spirit’ Achievement; completing it with a Perfect Score will also gain you ‘Party’s Over’.

Mission 9: Modern Art
This level has a lot of back and forth, so please forgive me. I tried to work in a (mostly) clockwise order around the main area of the gallery first, but thankfully, the main exhibits are all colour-coded so I’ll be sure to identify things as best I can.
Secret 1: In the first room you’ll enter (when working clockwise from the start), you’ll see a band on a stage behind some plexiglass cabinets. On the wall directly to the right of the stage, there are six clear cassettes on the wall, that open up when interacted with. At the top, is a smaller, glowing, gold cassette. Work your way up the wall by opening one cassette case at a time and jumping up onto it before opening the next, and once you reach the top, interact with the gold cassette; this will then reveal a secret area you can access up above the stage. Jump across into this newly opened area to discover the Secret.


Tape 1: On the stage, you’ll find the first Tape “Garbage Band“. The stage is blocked by a glass screen, so can’t be accessed from the room it appears to be in; instead you need to go through to the next room (with all the tapestries on the wall) and go through the door at the back-right to find a sort of maintenance corridor. Follow it round to the left and you’ll eventually come to the entrance to the stage.
For some strange reason, even after picking this one up, it had a tendency to reappear every time I returned to this area to put more instruments in place. So just bear that in mind, in case you think it’s like the tape from the Short Circuit level - it ain’t.


Tape 2: Accessible through the ‘Duck Room’; you’ll need to go up the stairs at the back-right and follow the corridor around; the next Tape: “Roma” can be found on the floor next to a supply crate (appears to be known as Lulu Suicide 3 in the Mission Complete screen).


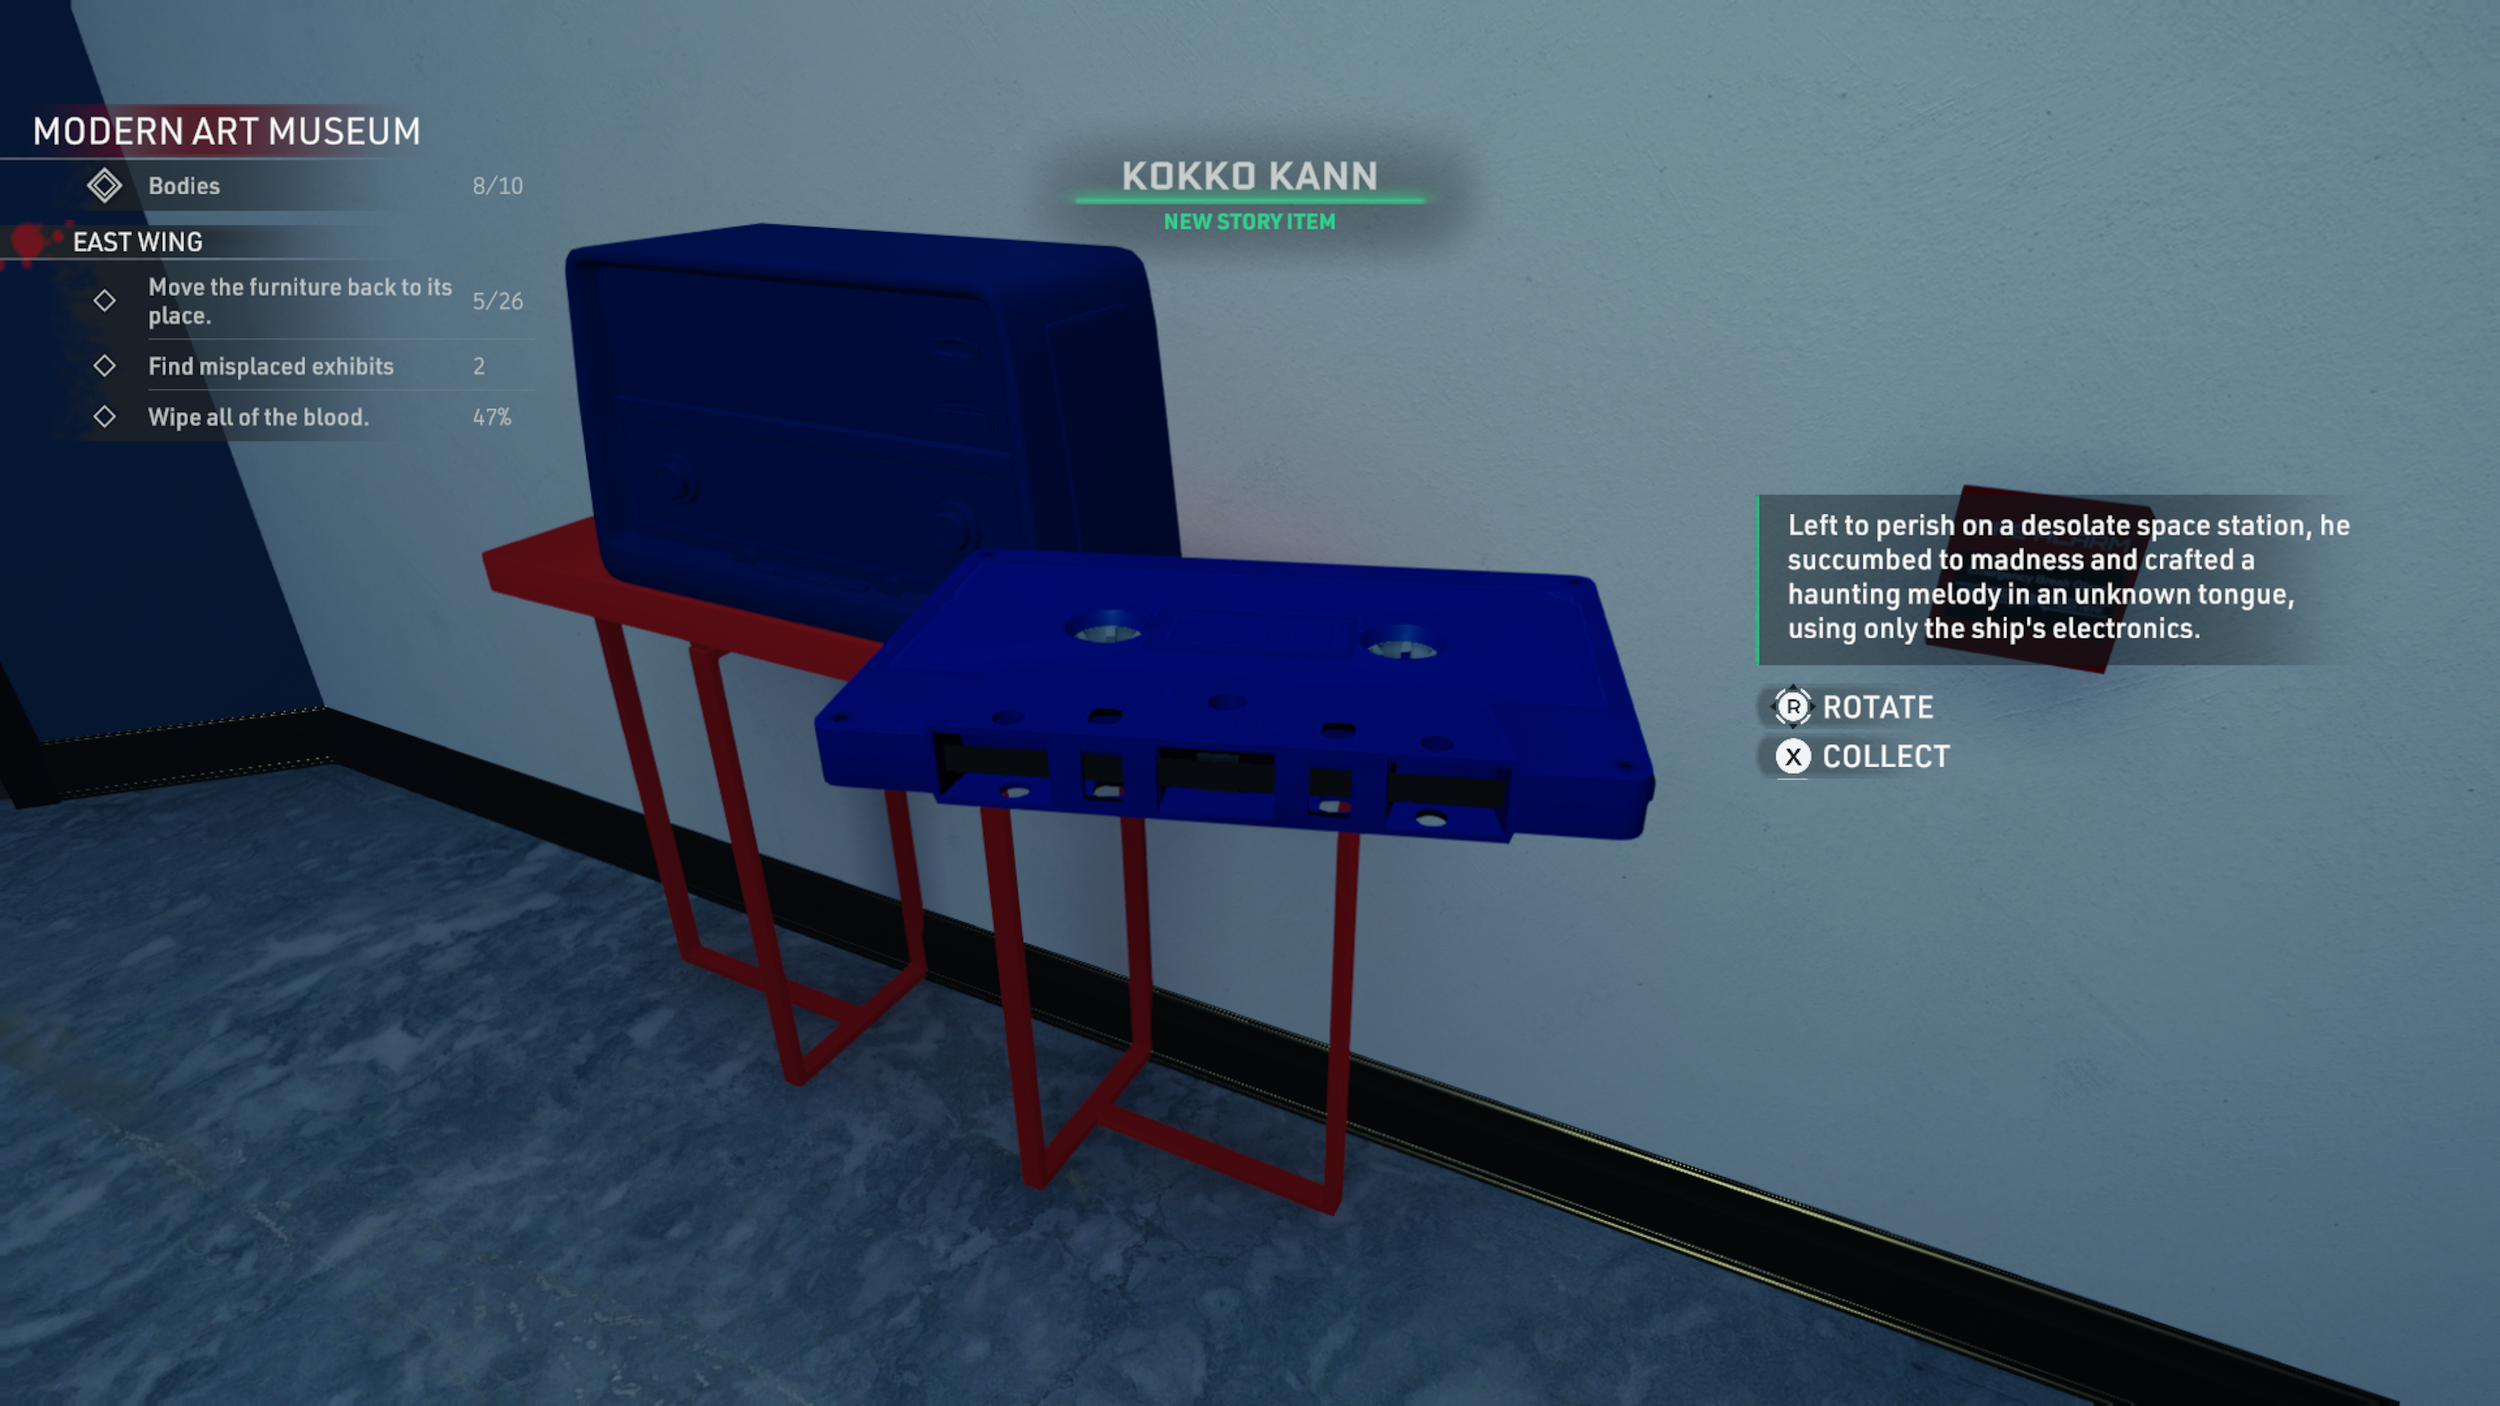
Tape 3: In the East Wing of the Gallery, within the red exhibit, there’s a small table just inside the door, with a blue radio and the next Tape: “Kokko Kann“ on it.

Secret 2: In the West Wing of the gallery (in the maintenance corridor), there’s a computer with six coloured screens above. These screens correspond to a puzzle you’ll need to solve in the North Exhibition. Work your way through the maze structure to the end, where you’ll find a stack of TVs. Interact with them until the colours match the screens you saw in the maintenance corridor (shown below) to unlock the door to your right. Go through the door to discover the Secret.
Walk all the way to the back of this newly unlocked area to find a Katana that is super handy for destroying crates, and be prepared to defeat a bunch of creepy mannequins to get back out of here. Picking up the katana will unlock the Achievement ‘Rage against the Machine’.


Tape 4: After you leave the Secret area mentioned above, a new creepy mannequins will be waiting for you, with the next Tape, “Economy of Pain” as a reward.


This is definitely one of the longer levels, just down to the back and forth - but if you need to go back to do any mop up, thankfully it’ll seem faster due to you already knowing where some of the exhibits are misplaced :) but anyway, the below image how your Mission Complete screen should look.
Completing the level will get you the ‘The Art of Dying’ Achievement; completing it with a Perfect Score will also gain you ‘Modern Art’.

Mission 10: Call in Dead
Secret 1: When you head down to the Power Supply area to get the power switched back on, break down the vent on the right of the generator and follow the vent through to the Secret area (which can then be opened up out to the car park).


Secret 2: On the ground floor (in the small portacabin room just along to the right from the hatch) you will find a ‘TV Room Key’. Head back down as though you’re going back down to the car park and you’ll see a locked room with a cardboard cut out outside - open the door and go inside to find the Secret area.


Tape 1: At the back of the above Secret area, behind the curtain, you will find more cardboard cut outs, and a pedestal with the first Tape on it: “Up&Down”.


Secret 3: On the ground floor, there’s a pile of wooden crates of varying height. Jump up and work your way up to the shelves, and follow the path around to the end to find a Secret book: “Dark Illusions”, hidden up high.


Secret 4: In the Control Room, there’s a door that you can’t open. Jump up onto the lockers directly opposite the door (you might need a ladder here, though I managed to get up using one of the office chairs), and follow the vent along and across to the opposite side. Break the vent and hop through and into the Secret Developer’s room.
Accessing this room will also gain you the Achievement ‘Lookin’ Out My Back Door’.


Tape 2: Up on the top floor in the Office, the next Tape: “Classical Music Collection Mozart Quartet No. 15, K 421, I. Allegro Moderato” (titled “Classical 4” in the Mission Complete screen), sitting on a small chest of drawers.


Tape 3: In the container lot, over to the right of the bucket filling tap, there’s a container that is slightly open (easily missed due to the view being obstructed by the forklift). Inside you’ll find a metal lunchbox with the next Tape: “Eine Woche Eine Ende” inside.


Secret 5: In another open container in the container lot (near to the body that is hanging over the edge), you’ll find an “Unknown Key”. This key opens the locked door in the Sorting Room, which contains a lot of Secret Egyptian valuables for you to steal.


Tape 4: In the Secret room above, on a crate you’ll find the final Tape: “Celestial Empire”.


Now that you’ve collected everything from this level, your Mission Complete screen should have everything checked off.
Completing the level will get you the ‘Killing in the Name’ Achievement; completing it with a Perfect Score will also gain you ‘Call In Dead’. If you have also made sure to get a Perfect Score on all other levels, this will mean completing all missions with 100% Deception; thus netting you ‘Perfect Crime’.

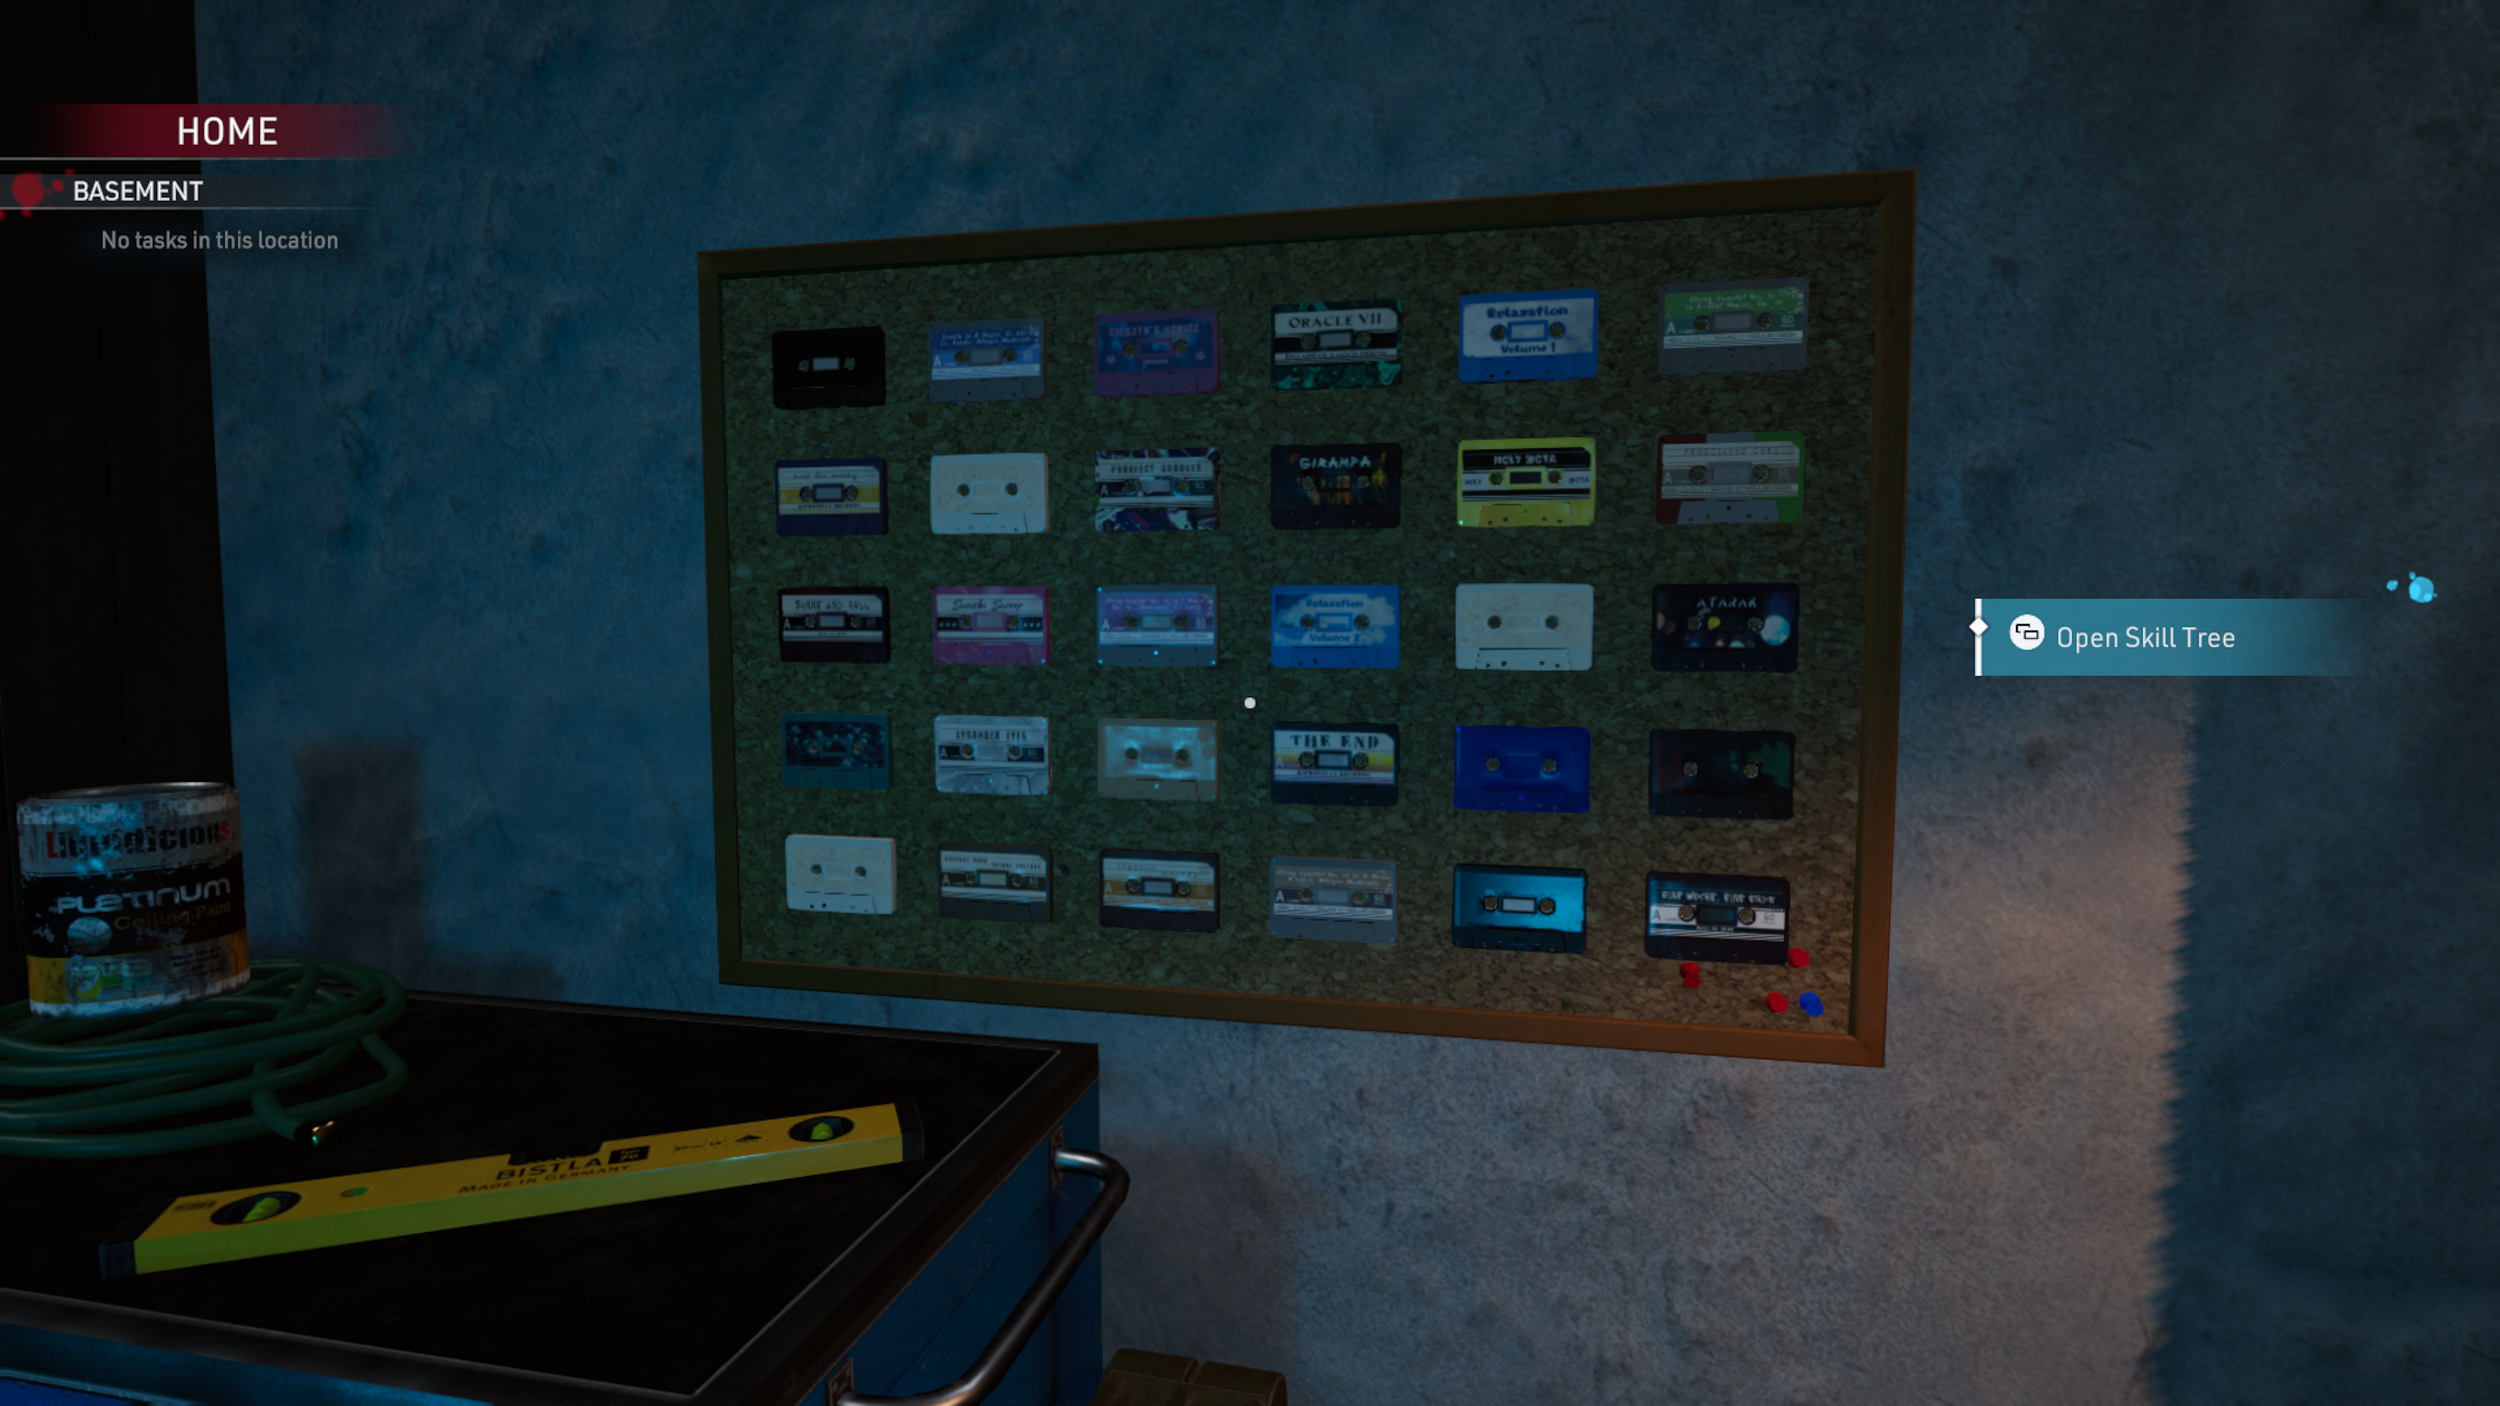
And now that you have everything from all of the Missions, if you go down into your basement back at your apartment, this board (on the wall to the right of your PC) will show all of the Tapes you’ve collected. Woo!
Finding all 30 Tapes will gain you the ‘Juke Box Hero’ Achievement.
So that’s all of the collectibles from Crime Scene Cleaner - let me know what other games you’d like a guide for and I’ll see what I can do :)
Have you been playing Crime Scene Cleaner? Which tape or secret did you struggle to find?
Let us know in the comments below!
- V x